garden
Creating a hidden drawer under the deck

There’s no such thing as too much storage, particularly when it comes to bulky and odd-shaped items.
So as part of my ongoing process of improving the house, I decided to create a hidden drawer under the deck.
The starting point was to cut the slats around the deck to create an opening.
I then created a sturdy box to enclose the drawer, to keep the weather out. This was made of exterior-grade ply, painted with two coats of black paving paint.
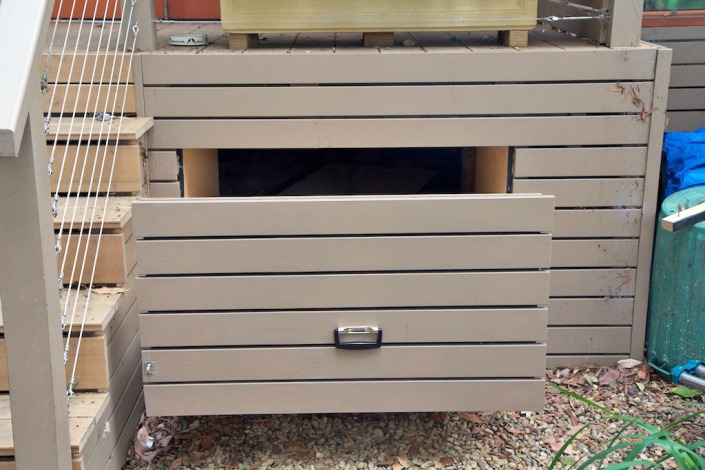
The drawer itself, made of two layers of ply glued together, runs on heavy-duty runners (rated at 250kg).
The final step was to attach the front face, also painted black, and to attach the slats to that.
The screw holes were puttied up, and then touched up with paint.

The end solution works rather well, I think. It’s a large size for the inconveniently-shaped garden tools, but is practically invisible.
Onwards to the next project!
Rescuing a wrought iron garden bench

It’s constantly amazing to see the things that people throw away. A few months ago, we saw the wrought iron sides of a garden seat abandoned on the nature strip. The iron was a little rusted but still in pretty good condition, but clearly the wooden slats had rotted through.
Instead of fixing the seat, out onto the street it went! It seemed too lovely a thing to go to waste, so I collected it as the basis for a good weekend project.

The starting point was to clean the wrought iron sides. I could’ve done this with a steel brush, but used a fancy attachment to an electric drill instead. I then repainted them with a water-based paint that included rust inhibitor. Quick drying, this only took half a day of elapsed time.
I’d measured up the slats on a friend’s similar garden bench, and new ones proved easy to source. Heading down to the local timber yard, I discovered the size I needed was pretty much the same as standard hardwood decking.
That gave me a heap of wood options, and I ended up choosing ironbark, simply because I liked the deep red colour. These just needed to be cut to length, with three of the slats trimmed down to a more narrow width (for the first and last slats on the seat).

After drilling the holes for the bolts, I treated the slats with two coats of linseed oil. This is brilliant for outdoor use, and incredibly cheap.
Some general stuffing around to bolt everything together, and the result is the seat shown in the first photo. It now sits at the bottom of the side garden, and it looks rather handsome.
Total cost? Approximately $90 for the wood, $40 for the paint, and only a few dollars for the bolts. Call it $130 in total, which is a fair bit less than a new one, and the lovely wrought iron is saved for another generation.
Topiary
On our recent visit to Tasmania we stopped in at Railton, famous for its topiary displays. While it is a smallish town, many of the residents and businesses have grown topiary so there’s plenty to see!


We’ve been growing our own modest topiary in our front yard, but as you can see below we have a long way to go 🙂

Backyard garden plan (Christmas 2012)
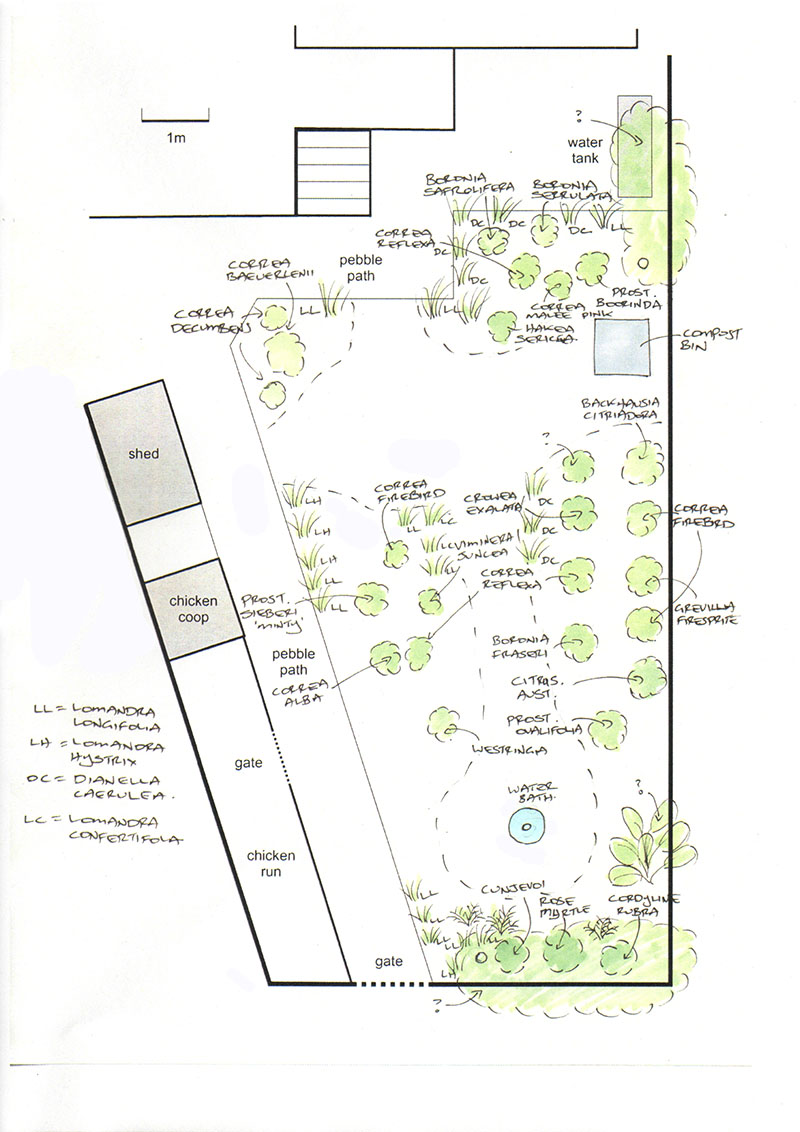
With a little bit of spare time in the lead-up to Christmas, I sat in the back garden and drew up a plan of what we’ve planted so far.
As much as anything, this is to help us keep track of what’s in the garden. We’ll keep it updated as we plant new things.
(The question marks note existing plants or gifts that we don’t have identification for, hopefully some knowledgeable visitor will fill us in.)
As discussed in the post The before shot, this will be a native “mini bush block” garden, designed for a semi-shaded position. Hopefully we’ll have a photo in six months that’s all green rather than brown! 🙂
A different approach to grey water
I’m now four weeks into the part-time Winter Permaculture Design Certificate course being run in Sydney by Milkwood Permaculture. In addition to the course material itself, Nick and Kristen bring along a great library of books to browse through during the breaks.
One that caught my eye was Create an Oasis with Grey Water by Art Ludwig.This is perfectly timed, as we’re half way through the design process for our house extension, and grey water was definitely on the list.
“Standard” grey water systems
I’d been looking into “standard” approaches to grey water, and wasn’t very impressed.
The basic design is to connect up the washing machine to a small-ish under-floor holding tank. A pump then extracts the water and sends it out to drip feeds throughout the garden. Health department regulations prevent the water from being held for more than 24 hours, adding complexity to the system. With tanks and pumps, there needs to be filters, maintenance and careful use.
These systems also aren’t cheap. Having a casual chat to my friendly water tank folks, they quoted a figure of $3000-4000 for an installed system, including all the extra plumbing.
The biggest issue is their limited use. Standard approaches involve connecting up perhaps just one appliance to the system:
- Washing machine: yes, assuming that suitable washing powders are used.
- Hand basins: yes, but why bother, doesn’t produce much water.
- Shower: NO, produces too much water, would overwhelm the drip feeds.
- Dishwasher: NO, too much solid matter.
- Kitchen sink: NO, too much solid matter.
So that’s $4000 for a system that diverts perhaps 200L of washing machine water into the garden once a week. Hardly seems worth the effort!
Branched drains
The grey water book listed earlier outlines a very different approach. The big advantage we have is that our back garden has a fairly substantial slope, meaning that gravity can do all the work.
This allows the installation of a “branched drain” approach, work works as follows:
- All relevant grey water sources (washing machine, dishwasher, shower, sinks) are piped to a single location under the house.
- The water enters into a gravity-fed system of 1-1.5″ pipes which head into the garden. (The pipes self-clean, preventing any blockages from solid matter.)
- The water is carefully split into as many feeds as required.
- Instead of using drip feeds (which block and only support low flows), the water is directed into mulch-filled basins.
- These basins feed trees, which can soak up a lot of moisture.
- The rest is absorbed into the ground, for the benefit of the rest of the garden over time.
The big benefit of this approach is its simplicity. From what I’ve read, it takes a lot of careful up-front design, but after installation it runs itself. No pumps, filters or maintenance. It will cope with large volumes of water, even when the ground is already wet.
The starting point for the design is to work out two things:
- grey water produced by the house
- “perk value” of the soil (how quickly water is absorbed)
I’ll work these out over the next few weeks, and will blog the results. Then I’ll start liaising with the plumber and architect to work out how to factor it into the building designs.
In the meantime, the Laundry to Landscape© Grey Water System page outlines a simple approach that can be taken by almost anyone to make use of the washing machine water with little or no effort or cost.
Garden snapshot: summer 2010

I’ve had a few comments from blog readers asking for a view of the whole vege garden. So here it is!
As mentioned in earlier posts, all our vege gardening happens at the front of the house, as this is where the sun is. It also makes great use of the odd triangle of land beside our house, even if it means working on a slope. The best thing, though, is the conversations it generates with other local residents, or general passer-byers.

These are our main garden beds, mostly corrugated iron dug into the slope. Starting at the front of the photo working back towards the fence:
- potatoes (not sure these are working well)
- fallow bed (getting replanted on the weekend)
- tomatoes, basil and pumpkins
- tomatoes, basil and sugar snap peas
- tomatoes, basil and broccolini
Beside the fence:
- cucumbers
- climbing beans
- raspberry
- passionfruit
- citrus trees (2x oranges, lemon, lime)
- silverbeet
- herbs, various

We’ve also got a series of smaller beds tucked in under the eaves. Starting from the front:
- common mint
- thai basil
- silverbeet
- spring onions, carrots and cabbage
- more of the same
- pumpkins
As a novice gardener, I’m still getting the hang of timing, so I don’t feel that the space is being fully used yet. (I seem to have at least one fallow bed at any given point.) Still, not a bad collection for a tiny suburban space!
Lemons, limes and oranges

The last major task for the front garden this season was getting in the citrus trees.
Two weekends ago, I started by marking out a garden bed 5.5m x 1.2m, and then dug that down to a depth of a foot-and-a-half (a back-breaking job!). I then constructed a treated pine frame to build the bed up.
I hadn’t quite done the numbers first, and discovered that I’d need an extra 2 tonnes of soil, or thereabouts. So another call to the bulk supplier, and a lot of shovel work later, and the bed was full.
The local Bunnings had a reasonable range of fruit trees, and this is what we ended up putting in:
- Orange, Lane’s Late Navel (full size)
- Lime,Tahitian (full size)
- Orange, Valencia (dwarf)
- Lemon, Meyer (dwarf)
Now to wait a season (or two) for a full crop…
Cabbages are bedded in

I’m excited by the rows of cabbages, both chinese and western. They should provide quite a crop!
Autumn planting: round two

Now that all four garden beds are in place, I could plant out the bottom two beds:
- Snow peas
- Cabbage, Chinese
- Cabbage, Savoy King
- Onions, red
- Onions, white
- Broccoli, Gamblers (from seed)
- Broccoli, Bambino (a single plant)
- Cauliflower, baby white
(Since I’ve left it a bit late, I’ve planted out all these from punnets rather than seed, with the one exception noted above.)
I’ve also got most of the rest of my kitchen herbs going:
- Rosemary
- Lemon thyme
- Oregano
- Chives
For some reason the parsley seeds haven’t come up, so I’ll give them another week and then might have to get a punnet instead.
Peas are growing strongly

It’s amazing to see the sugar snap peas add about a centimetre of height every day.
