Renovating the house
Cleaning the gunk out of our water tanks
It’s coming up on eight years since we installed our first 5000L water tank, put in during drought conditions. Since then we’ve added two more tanks as part of the renovation.
Over Christmas, when we had three dry months, our tanks dropped to nearly empty. They also started to stink, clearly the results of anaerobic decomposition of the plant material washed off our roof. Smelly water feeding into the washing machine, not good!
Our setup has first flush diverters, designed to capture the first lot of dirty water that flows into the gutter. They’re not magic, however, and gunk still gets in to the tanks, and builds up over time.
In the country, where households have to rely exclusively on their water tanks, it’s routine to get them cleaned out every while. I haven’t heard of it being done in the city, however. This might be because most of the tanks were put in at the same time as us, or later, and the problems are only now starting to emerge.
When we were out at a country show, we collected a business card from Leigh’s water tank cleaning, who we talked into dropping by our place when he happened to be heading into the city. We also talked to the Water Tank Cleaning Company who operate throughout Sydney (their website was down at the time of posting).

Leigh was very friendly, the the process is surprisingly simple. It’s basically a hand-manoeuvred version of a pool cleaner, which is steered around the base of the tank where the gunk has accumulated.

It’s somewhat horrifying to see how much dark brown water gushes forth. No wonder our water filters kept getting clogged up, trying to deal with all that!

It’s a quick process, and within half an hour, our two main tanks were done. That should keep them going for a few years…
A video about our eco house renovation
A few months ago, the environment team at Marrickville Council (now part of Inner West Council) came by to film an interview with me, about our eco renovation. This has now been published, along with insights from two other houses. Enjoy, and I hope it will be useful!
PS. the Inner West Council provides some great resources and support for households wanting to reduce their environmental footprint. Their team is passionate and effective, and I’d encourage you to get in touch.
Redo: oiling our kitchen benchtops

One of the eco-minded decisions we made when we created our environmentally-friendly kitchen was to leave a raw, unsealed surface on our benchtops.
The benchtops are made of kauri pine, a softwood local to Australia, New Zealand and the Pacific Islands. Its very fine grain makes it highly resistant to water, and the early settlers even used to make their whole sinks out of the wood (with no metal at all!).
The benches are very resistant to staining, and even beetroot spills faded away within a matter of days. A scrub with a pumice soap periodically would then remove any left-over marks.
The only issue was around the sink area. Here, the iron and minerals in the water would deposit themselves into the grain. The result was a dark, almost black coating around the sink. While it was perfectly hygienic, it was unsightly.
So we finally decided to oil the benchtops, after giving them a thorough sand. Ian Thomson, who constructed our glorious kitchen, was more than happy to help.
We when used Organoil Hard Burnishing Oil to seal the wood, which is food-grade, and only slightly darkens the colour.
The result is lovely, and will now remain lovely, even in the face of heavy use.

Creating a hidden drawer under the deck

There’s no such thing as too much storage, particularly when it comes to bulky and odd-shaped items.
So as part of my ongoing process of improving the house, I decided to create a hidden drawer under the deck.
The starting point was to cut the slats around the deck to create an opening.
I then created a sturdy box to enclose the drawer, to keep the weather out. This was made of exterior-grade ply, painted with two coats of black paving paint.
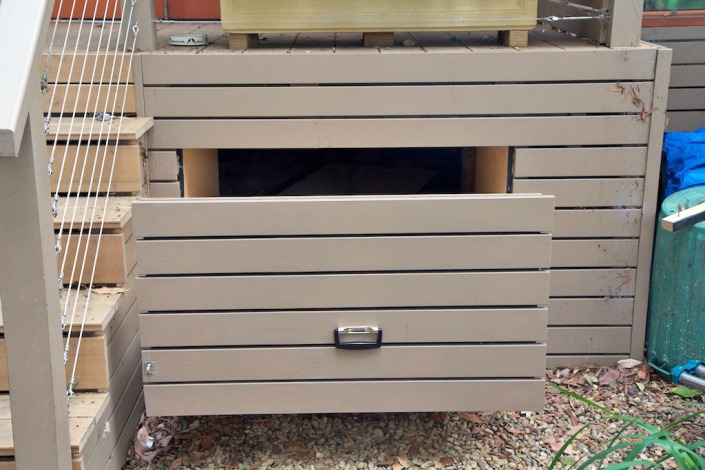
The drawer itself, made of two layers of ply glued together, runs on heavy-duty runners (rated at 250kg).
The final step was to attach the front face, also painted black, and to attach the slats to that.
The screw holes were puttied up, and then touched up with paint.

The end solution works rather well, I think. It’s a large size for the inconveniently-shaped garden tools, but is practically invisible.
Onwards to the next project!
Our house is in this month’s Sanctuary magazine

We’re honoured to be included in this month’s Sanctuary magazine, which is featuring a number of houses that have been involved in Sustainable House Day.
(It’s a great magazine, with a lot of other wonderful case studies of green projects. Rush out and get a copy!)
Sustainable Design Information Night (Marrickville, 26 June 2013)
 On Wednesday June 26, Marrickville Council will be hosting a Sustainable Design Information Night. This event aims to give Marrickville’s residents an overview of the key elements of a sustainable house design and to provide residents with the opportunity to ask questions of an expert panel.
The panel will be made up of an architect, building designer, builder and home renovator. James will be the home-owner 🙂
It should be an interesting night, so if you’re in the Inner West, hope to see you there!
Installing solar-powered roof ventilation
Some time back we installed a R3.5 batts in the roof of the original half of the house, along with reflective foil. Despite this, the roof space still gets very hot in summer, and after a run of really hot days, we can feel the heat radiating down into the rooms over night.
For this reason, it’s highly recommended to ventilate the roof space during summer. While traditional ‘wheely birds’ are an option, what I’ve read suggests that they simply don’t draw through enough air in an hour to make a real dent on a typical roof.
We therefore focused on an active ventilation system. There are heaps of different options, but my search narrowed down to two products, both solar-powered:
In the end, we went for the Solar Star, which seemed like the better fit for our needs. For the size of our roof, a single Solar Star RM 1200 model was the recommended option, and we bundled in a thermostatic control.

Installation was simple enough. It comes with a plastic flashing suitable for a corrugated roof, plus the necessary screws and instructions. We further simplified the process by fitting the unit directly under the ridge capping, which allowed us to skip a lot of the more fiddly waterproofing steps.

All up, the job took about an hour, most of which involved getting the tools onto the roof and generally stuffing around.

Ideally, at this point I’d be able to report (with graphs!) the roof temperature before and after installation, compared to the outside temperature. But life has been busy!
So I can report that the fan runs steadily and quietly, and I’ll post later with a purely qualitative assessment of the impact.
We’re part of Sustainable House Day this year

It’s great to see what people have done to meet sustainability needs, and this is what makes national Sustainable House Day so valuable. Put it in your diary: Sunday 9th September 2012, 10am-4pm.
There are a bunch of houses across Sydney participating, including ours.
We’d love for you to drop by for a tour or a chat, and this is what you’ll see:
- Sensible sustainability improvements to a free-standing Federation House, including solar panels, water tanks and insulation
- A recently-completed eco-extension, the result of six months of owner-builder work. Lots of natural wood, a rammed earth wall, low VOC products, double- and triple-glazing, and much more besides.
- A permaculture garden that gives us almost complete self-sufficiency, including backyard chickens and native stingless bees.
Our house is right next to Lewisham Station, and a short bike-ride from the city 🙂
Browse the list of houses open on Sustainable House Day, and plan your visits!
Photos of our new living room

While we finished our home renovation about six months ago, it always seems hard to find the time to get some photos taken!
We’ve already shared photos and details on our kitchen and pantry. These are some photos of our open-plan living/dining room.
There’s a lot of eco-features here, including the rammed earth wall, double/triple glazing, LED lighting, etc. But I’ll leave all that information for a future post, and just share the pictures.

Problems with the conventional building project
We always assumed we were going down the “traditional” building route, as follows:
- Hire an architect or “building designer” to create a set of plans.
- Make a guess on the cost of the project, based on “$x per square m, multiplied by the size of the extension”.
- Use the plan and guessed budget to get council approval.
- Create a tender, outlining the project and a bunch of the details.
- Get three or more builders to quote on the job.
- Pick the cheapest.
- Haggle, then sign a fixed-price contract.
- Get going!
As we proceeded through the process, we started to have increasing concerns.
The building designer was fine, although there were times when we felt he wasn’t fully listening to our needs. We also kept wanting to know when the details would be worked out, but were always told “later”.
We liked the final plans, even though it took us twelve months to nail them down.
It was here that we really started to get nervous:
- How would we find an initial list of good builders to go to?
- Would they give us a meaningful quote, or just a quick guess?
- When did the uncertainties get resolved?
- What would stop us from getting hit with “death by a thousand project variations”?
- How could we assess the quality of the builder?
- If we were expected to pick the cheapest quote by default, wouldn’t that mean we’d get the shonkiest by default?
- What about the unusual elements, like the rammed earth wall?
- How much was this actually going to cost?
In the end, we stopped. And headed down the owner builder route, which we don’t regret.
In my day job, I help companies run tenders and projects. This leaves me convinced that the “traditional” building route is fraught with problems, at least in the residential space.
Issues with traditional building processes
These are a few of the issues that I see:
- Uncertainties aren’t dealt with. There are easy bits to every building project, and there are the unknowns. We knew that strange things such as the rammed earth wall could cause problems, but it’s the unexpected things that get you. For example, our building designer had drawn a magnificent arrangement of doors and windows out onto the deck. Luckily, we thought it could be useful to get some early quotes to help with our budgeting, and quickly discovered that what had been drawn was unbuildable. Had this been a traditional approach, we only would’ve found this 1/3 of the way into the build, blowing out our budget, and costing us six weeks of time to resolve. Ouch! And this was just one of the uncertainties that would’ve lain in wait for us, had we gone down the traditional route.
- Costs aren’t managed. As a result of the issues outlined above, the builders’ initial quotes are little more than educated guesses. There also isn’t a reason for them to commit huge amounts of time during a tender to accurately assess things, leading almost inevitably to cost over-runs later in the project.
- Building materials aren’t carefully selected. The tendering builders make a set of assumptions about building materials when quoting, and these often aren’t the highest spec. Once building starts, it can be quite difficult to change materials, impacting on both quality and environmental impact.
- Cost trumps quality. It goes without saying that picking the cheapest builder hardly biases the project towards quality.
- Changes are hard. With a fixed price quote, it’s inherently hard to change things. And every change encourages the builder to inflate the cost of the variation.
- Speed discourages thinking. While modern building practices are very efficient, having a pile of trades on-site means decisions get made in a hurry, leaving little time for tuning and refining the design.
In short, the traditional approach seems to virtually guarantee budget blow-outs, unpleasant surprises, and cut corners. No wonder there are so many horror stories of projects finishing 150% over budget, and a year late. Crazy stuff.
Now I’m not saying that you can’t get a great house at a great price, going through the standard process. It just seems to me that the odds are stacked against it.
While we went down the owner builder route in response to these concerns, I’m convinced that a more sensible approach to traditional practices could also get a good outcome. Such as exploring the uncertainties earlier, getting the preferred builder to do initial “scoping” to refine the cost and materials, and tuning the fixed-price/cost-plus models.
What do you think? Should we be building houses differently?
