Uncategorized
Rescuing bees from a compost bin
A week ago I received a call from someone just the other side of Lewisham, saying they had a bee problem. What I found was pretty funny!
Apparently a swarm of bees had taken residence in the backyard compost bin. In an effort to discourage them, the property owners removed the lid. Despite the difficult circumstances, however, they bees kept soldiering on.
The process of rescuing the bees is relatively straightforward. Going in with a knife and hands, the pieces of comb are carefully removed from the hive. They’re then rubber-banded into empty frames.
(You can see a mix of brood — baby bees — on the right, and partially filled honeycomb on the left.)
To encourage the bees to move into their new home, I placed the hive directly on top of the compost bin. Later that night, they apparently all moved into the hive without any complaints.
What’s amazing is that it’s possible to do all this without getting any stings! Despite me literally attacking their hive with a knife, they were relaxed throughout. Phew! (It doesn’t always go this smoothly.)
Last night, the bees were sealed into the hive, ready for their move down to the farm, joining the three hives already in place.
Once they were unsealed, the bees rapidly spread out to ‘re-map’ their new location. Within a few hours, they’d settled down, and this afternoon I did the final clean-ups of the hive, again without any angry bees.
Beekeeping always throws up interesting surprises!
Planting as we go
Too many properties are landscaped as an afterthought, with plants going in long after all the other work is done (or not at all). This is not how we’re tackling Lewisham Farm.

We’re intentionally planting as we go, entirely with Australian natives. This includes a wide mix of callistemons (‘bottle brushes’), grevillias, banksias and leptospermums (‘tea trees’).
There are good reasons for these plantings:
- Most flower heavily, attracting native birds and feeding the bees.
- They will flower throughout the year, providing Priscilla with cut flowers.
- They will screen things like the shed and water tanks, blending them into the landscape when viewed from the house or road.
- They help to define ‘garden rooms’, breaking up the acres into smaller spaces with their own character.
- When planted densely, they will keep down the weeds, at least to some degree.
- They will be beautiful, making the farm a lovely place to spend time.
By planting them early, they get a head start in the disturbed soil, before the grass and weeds have had a chance to reestablish themselves. It also means that we’ll get the benefits sooner!

By largely using tube stock plants, the cost of plants for a given area is only $50-100, which is nothing in the scheme of things.
And there’s much more planting to come…
Putting in place the basics of farm infrastructure
As you can see from the “before” fly-over, our farm came with a lovely farmhouse, but not much else! Certainly not enough considering we’re totally off-grid in terms of power, water and sewage.
So while we’ve started planting out the first few patches of the edible forest garden, the focus has been on getting the basics of farm infrastructure in place.

The centrepiece of these efforts has been the new farm shed (aka “the barn”). The local council required us to position it away from the road, so it ended up half-way down a slope.
Echoing the design of an American barn, the shed is 10.5m wide and 7m deep, with a big 3m x 3m central door for the tractor.

Since the barn is now in the middle of a field, a new internal driveway was required. Befitting the location of the house, we decided to go all-out to create a pretty road.
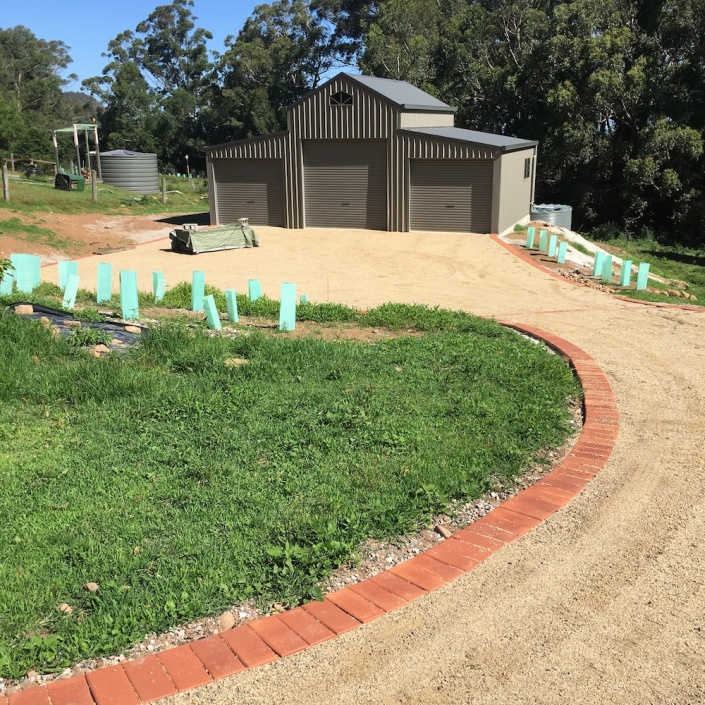
This meant a road surface of crushed granite (on a solid road base), with brick edging (on a concrete edge laid alongside the full length of the road). With Priscilla’s keen eye for aesthetics, we laid the road out with elegant “swooping” curves. We put a single car-parking spot in front of the house, plus a large parking area in front of the barn.

The final phase was the addition of two 22,000L plastic water tanks below the barn, to catch the run-off from the roof. This triples our overall water storage.

Oh, and with the barn in place, I was able to purchase a brand-new 46hp Kubota tractor, which will be vital in reshaping the property 🙂
This is, however, still just the start of more work needed on the basic infrastructure. Activities yet to be done:
- One final water tank on high ground, which we’ll switch to using for the house, plus the garden. That will get us up to about 100,000L in total.
- A water pipe laid from the barn tanks (at the bottom of the property) to the new water tank (at the top), with a solar pump used to get the water up the slope.
- A power line run to the final tank, for a good-sized pump.
- A vegetable patch and greenhouse, with a water line run from the tank.
Phew! Still, a lot of this can be done with the new tractor, and everything is more fun with a tractor 🙂
The bees are bearding, early in the season
While the winter and spring has been dry in Sydney, it’s still a great place for the bees.
Even early in the season, several of our hives have been “bearding”. This is where the hive is getting very full — and therefore hot — and a bunch of the bees head out of the hive.
Some of the bees fan cool air into the hive, while others climb up the side of the hive as a “beard”. A few days after this video was shot, we harvested our first box of honey. I think it’s going to be a busy season!
Creating a horizontal Warré hive
I’m a big fan of Warré hives, and I have five in total, with most in Sydney and a growing number at Lewisham Farm down the coast.
When I was first learning from Tim Malfroy, he showed what he called a “coffin hive”, but I’d prefer to call a “Horizontal Warré hive” (much less scary!).
With a little bit of spare time at the end of winter, I decided to make one of my own.

This is basically a Warré version of a Kenyan top bar hive (there’s also a “long Langstroth” that I’ve seen pictures of). It holds the equivalent of three boxes worth of frames, give or take.

It offers some of the advantages of a top-bar hive, such as easy access to the hive, with no heavy lifting. It has an entrance at both ends, which can be used to easily split a hive in summer to create two hives (the second entrance is normally kept closed).
It’s obviously also interoperable with a normal Warré hive, which makes it more versatile.

It’s important that the hive doesn’t warp, otherwise the frames won’t fit. So I constructed the hive from 30mm thick recycled hardwood (mostly Sugar Gum).
I was able to get the wood at half price from the odd-ends pile at my local lumber yard, but it still ran to $403 of materials. So not a cheap experiment, but something worthwhile nonetheless.
Now I just have to catch a swarm, and I’ll be off and running!
I’ll report on how the hive works as the season progresses, watch this space…
Second citrus patch planted

Following on from our first patch of dwarf citrus, a family work gang has helped us plant out our second patch. This is of full-sized citrus, with supporting guild.
A few notes:
- With full-sized rather than dwarf citrus, patch 2 is a little under twice the size of patch 1.
- The ‘spine’ of the planting are three Elaeagnus Ebbingei a nitrogen-fixing plant that increases the fertility of fruit trees, and is highly-recommended for permaculture gardens.
- There’s a mix of native citrus (eg finger lime), introduced citrus (eg navel orange) and a few that are hybrids of the two (eg sunrise lime).
- I’ve snuck a few berry bushes into the understory on the Eastern side (currants and gooseberry). I want to test how they perform in increasing shade, as well as seeing whether all the fruit is eaten by birds, etc. Consider it a living experiment 😉
- As before, everything is sheet mulched, with a bunch of ‘in-fill’ plants to go in shortly to shade out any weeds.
With Spring coming, lets see how this patch goes!
Our vision for Lewisham Farm and its edible forest garden
The transformation of our 22ha property overlooking Nowra will take several decades. A core part of this journey is creating an “edible forest garden”, as described by Dave Jacke in his books with Eric Toensmeier.
One of the starting points is to document a clear vision or goal statement. There’s a few reasons for doing this:
- it’s hard to get somewhere if you don’t know where you’re headed!
- an edible forest garden requires long-term planning
- there are many different ways of creating a garden
- there are often multiple people involved, with different goals, but with the need for a common vision
In our case, Priscilla is all about country gardens & flowers, and I’m all about big-scale transformations. So we sat down, did some brainstorming, then some wordsmithing.
I’m sure this vision will change hugely over the coming years as we learn a heap, but this is where we’re starting. (Note that Jacke recommends writing the vision as we’ve already achieved the outcome)

At the centre of the property, the country-styled house is surrounded by a delightful cottage garden. Laid out in neat shapes, it provides a relaxed environment and a year-round supply of cut flowers.
Surrounded by vibrant rainforest on all sides, the broader property is devoted to an Australian ‘edible forest garden’ that provides an abundance of fruits, nuts and native bushfoods. Arranged as interconnected fields and ‘garden rooms’, the local micro-climates have been exploited to allow a great diversity of spaces, each with a very different feel and mix of plants.
There is also a tranquil pond with ducks, productive bee hives, a vegetable patch and a greenhouse for propagating plants.
Our friends and family have also enjoyed the escape from the city, as well as helping with every stage of the transformation. The small eco-cottages set in the more distant fields are rented out to provide a modest income.
This has been a decade-long journey, with the learnings shared with the wider permaculture community. We’ve been able to show how much can be done by part-time farmers, and how Australian rainforest plants can be integrated into a food-growing system. (1 August 2017)
The first beehive arrives at Lewisham Farm
The plan for our new farm includes a having a number of beehives, to complement the three we already have in Sydney.
So when I heard through the grapevine that a Canberra-based beekeeper was looking to downsize their collection of Warré hives, I jumped on it. Beekeeping does end up taking quite a bit of time, so its no wonder that many beekeepers end up trimming down the number of hives they keep.

The hive was in a community garden, where it was happily surrounded by vegetables and fruit trees.
Preparations were made the night before the move, putting on a ventilated lid, sealing up the entrance, and strapping everything tightly. It was then just a matter of getting the hive onto the ute, for the 2.5 hour drive down to the coast.

Within ten minutes of opening the hive back up the bees were busy flying around, surveying their new location. While there isn’t a huge amount flowering on the farm (it’s mostly rainforest), we do have several hectares of weeds that will keep them going!

The plan is is to add a second Warré hive, and a Kenyan top-bar hive, and then see how we go from there. And once we get our plantings underway, they will be very happy hives 🙂
Drying our own (uncommon) herbs
Dried herbs are a pantry staple, used in everything from roasts to pasta sauces. While they’re easily obtainable in every supermarket, it’s nice to make your own.
Particularly when you’re drying herbs that simple can’t be found in shops.

Pineapple sage, apart from being loved by bees, makes a delicious tea. Infuse a teaspoon’s worth of herbs for 5mins, and then drink with delight.

Lemon-scented tea tree (leptospermum peteronii) has a lovely lemony taste, as the name would suggest. Distinctly different from a lemon, the dried herb can nonetheless be used as a replacement for lemon in soups, etc.

All of these herbs were dried in our cool cupboard, and the biggest effort is plucking off the leaves to store them.
What herbs are you drying from out of your garden?
Checklist for placing a beehive in urban locations
When you drive into the countryside, you often see hives placed in fields, or beside the road. By themselves, or in a cluster, these hives seem perfectly suited to their location.
In urban settings, there are no wide open fields. Hives can’t be placed in forest clearings to catch the honey flow. There is no space to use mechanical aids to lift or move hives.
In many ways, however, urban areas are ideal for bees. There is a constant supply of flowering plants — even during dry times — thanks to the constant watering of household gardens.
Urban hives often prosper, and many inner-city residents are delighted to see more bees in their area.
The challenge remains to put the hives in a practical location, working within constraints and limitations. This post starts with a few guiding principles, and then outlines a checklist of factors to consider.
Use these to assess potential locations for your hive(s), to make your life — and your neighbours! — easier.
Guiding principles
- it must be safe to work on the hive
- there must be sufficient space to work efficiently
- the hive will prosper in its environment
- problems with neighbours or other locals will be avoided

Site selection
❏ It’s possible to get a full, heavy hive in and out of the location (on a trolley for example)
❏ Ideally the hive can be accessed without going through the house (beekeeping is a sticky hobby!)
❏ Ideally, the hive is placed on a flat surface (level ground, or a flat roof)
❏ There’s a solid foundation or platform for the hive to sit on (hives can get heavy!)
❏ The hive won’t flood during heavy rain, or have its foundation eroded away
❏ No tenancy rules are broken (for example, a hive may not be allowed on a balcony of a block of flats)
❏ House lights don’t shine on the hive at night (otherwise bees will fly in through open windows and doors)
❏ Windows and doors overlooking the hive entrance should be protected by flyscreen, wherever possible
❏ The hives isn’t adjacent to any sensitive locations (such as a childcare centre next door, busy dog park, etc)
❏ The neighbours have been told about the hive and are happy for it to be there (promises of free honey often help!)
Access and working area
❏ There is at least 9 square m of working space around the hive (3m x 3m)
❏ The space around the hive is solid and easy to work on (ie no bushes, loose rocks, slippery surfaces)
❏ There is space to stand and work behind the hive (the safest location)
❏ It’s possible to get a hive lifter (or other necessary equipment) behind the hive
❏ There should be sufficient space for 3 people to work on the hive (one owner, and two helpers or novices)
❏ There are clear escape routes if — heaven forbid! — something goes wrong, and you are faced with a hive of very angry bees
❏ There’s no height restriction (a particular consideration for Warre hives, which can get very tall)

Hive considerations
❏ Ideally, the entrance to the hive should face East (although the bees seem to cope fine if this isn’t the case)
❏ There must be a clear flight line in front of the hive, of at least 3m
❏ Any fences in the flight line must be far enough away, or low enough, not to impede the movement of the bees
❏ In cold areas, the hive should receive winter sun
❏ In hot areas, the hive should be protected from the full summer sun
❏ Ideally, it should be easy to monitor the hive entrance throughout the year (eg a sight line from the balcony, deck, window, etc)
❏ Hives should ideally have a relatively placid temperament, to avoid the situation of angry bees attacking the neighbours
❏ There should be a reasonable number of hives in the location, so as not to cause nuisance or safety issues
Bending the rules
In urban areas, hive owners face many practical constraints. The balcony might be quite small, or the back yard heavily sloping. The courtyard may be flat and sunny, but surrounded by high walls. Plantings may impede the working area around the hive.
Rules can be bent or even broken, but with care and due consideration. Every compromise must be understood, and always go back to the guiding principles.
Safety must always be a prime consideration, not just for the apiarist but for neighbours and visitors.
Three of my hives are on the roof of our house, for example. This has restricted access (ladder required!), but there is 100sq m of flat roof to work on. This would not have been my first choice, but our backyard was too small for hives. Having implemented a few safety improvements, this location is entirely workable.
If you really don’t have a good location for bees, don’t despair! Many people would love to have bees in their gardens, and be a host for your hive. The general rule is that the honey harvests are split 50/50, but that still leaves plenty for everyone. More importantly, it allows you to be a true beekeeper, and to benefit from an amazing experience.
Happy beekeeping!
