autumn
Pickling large cucumbers
Late in the season I planted two cucumber plants, with no great hopes for them. In Sydney’s hot and humid climate I’ve found that cucumbers, zucchinis, etc are killed off by powdery mildew long before they produce any real crop.
This time was different, and we were quickly overwhelmed by a glut of cucumbers, some of which had grown quite large.
Sandor Katz to the rescue! His book Wild fermentation — which really kick-started the recent fermentation movement — provided a useful recipe for sour pickles.
Undeterred by the fact I didn’t have lots of tiny “pickling cucumbers” I instead cut my big cukes into thin half-discs. The recipe suggested including grape or oak leaves to keep the pickles crisp, so I scavenged some oak leaves from the convent next door.

Into a big jar went the cucumbers, along with peppercorns, garlic cloves and dill flowers. I added an airlock, and left it to blip away for 3 weeks. And they behaved themselves perfectly: they didn’t bubble up and out the airlock, no mould grew on the surface, and the cucumber slices kept their shape.

We ate some slices today on a ham sandwich, and they are delightfully tart. Another win for Sandor, thanks!
Constructing our first compost pile at the farm from pallets
If there’s one thing that gardening produces a lot of, it’s green waste that needs composting. So while we have a small compost bin for the farm’s kitchen scraps, a proper compost pile is needed for the garden, even at this early stage.

One of the easiest ways to create something fairly solid is to assemble a compost bay from pallets. What’s nice is that pallets are a free resource (the unbranded ones that is), which can be obtained (with permission!) from the loading bays of many shops.

The pallets are quite easy to screw together, to create a bay that’s two pallets wide, and two deep. Cover the inside of the pallets with shade cloth (or equivalent) to stop the compost falling out.
A half-size front makes it easier to add to the pile, and this is just wired on, allowing it to be easily removed when the compost needs turning (or harvesting!).

We’re only a few months into our farm adventure, and already we have a good-sized pile that should be ready by spring or summer. Happy days.
The first beehive arrives at Lewisham Farm
The plan for our new farm includes a having a number of beehives, to complement the three we already have in Sydney.
So when I heard through the grapevine that a Canberra-based beekeeper was looking to downsize their collection of Warré hives, I jumped on it. Beekeeping does end up taking quite a bit of time, so its no wonder that many beekeepers end up trimming down the number of hives they keep.

The hive was in a community garden, where it was happily surrounded by vegetables and fruit trees.
Preparations were made the night before the move, putting on a ventilated lid, sealing up the entrance, and strapping everything tightly. It was then just a matter of getting the hive onto the ute, for the 2.5 hour drive down to the coast.

Within ten minutes of opening the hive back up the bees were busy flying around, surveying their new location. While there isn’t a huge amount flowering on the farm (it’s mostly rainforest), we do have several hectares of weeds that will keep them going!

The plan is is to add a second Warré hive, and a Kenyan top-bar hive, and then see how we go from there. And once we get our plantings underway, they will be very happy hives 🙂
Sauteed choko with tarragon
As posted earlier, we have a lot of choko, kilos worth. Thankfully we’ve discovered that it’s actually delightful, not the horrible make-do vegetable of reputation.
To demonstrate this, I’ll share a few recipes that we’ve used to get the most of choko, starting with sauteed choko.

Sauteed choko with tarragon
Cut the choko into thin “chips”, discarding the outside skin if tough.
Heat up olive oil in a frying pan, with some butter.
When the oil and butter starts to foam, add the choko, along with a sprinkling of dried tarragon.
Toss in the oil, and cook until the choko is tender, when tested with the point of a knife.
Add salt and pepper to taste, and serve!
This works wonderfully alongside meat, such as a steak or sausages. Yum!
Our first (and only) avocado
Six years ago I established our guerilla-garden food forest, which included a wide range of apples, plus citrus, avocado and macadamia.
We’ve had a good crop of apples, and an ongoing supply of citrus of various sorts.

And finally, we’ve now had our first avocado. It being our only avocado, we treasured it, and spread it on toast for breakfast. Yum!

Hopefully we’ll have a good crop next season, now that the tree is finally mature enough…
A giant windfall of choko

This is what 22kg of chokos look like, 56 fruit in total.
Two days ago, we had a day of very strong wind as a cold front went through. This dislodged the ripe fruit in our choko vine that had grown all the way up into the trees. A single vine, that is, and there’s still fruit on it!
I needed to get a left-over grain bag to collect them all, and a bunch of them had cracked when the landed on the convent driveway next door. No matter, we’re steaming the broken ones to feed to the chickens, which they love!
The rest we’re eating. Expect to see a bunch of choko recipes posted to the blog over the coming weeks… 😉
Buying a box of bugs

Sydney’s warm weather promotes the spread of a hundred types of bugs, most of which seem to love our pumpkins, cucumbers and zucchini.
This includes whitefly, which can multiply to plague proportions, covering the underside of every large leaf in the garden. Whereupon they proceed to suck the life out of the plants.

So with the refrain of “whitefly, begone!”, I ordered a box of bugs. Montdorensis to be specific, which feed on whitefly and thrips (of various sorts).

A small cardboard tube contains 10,000 of these good bugs, and I’m hoping that they’ll establish a permanent presence in our garden (apparently they feed on mites and pollen when thrips are absent).
Good hunting little bugs!
Enjoying then preserving our apple crop
With our first good crop of apples this year, there have been plenty of apple-based recipes. This includes a delightful apple and marmalade cake from River Cottage: Fruit every day!, plenty of apple crumbles, apple pies, and the like.
Still, two people (even with friends) can’t easily get through four buckets of apples. So onto preserving!
I started by creating some jars of apple and mint jelly, using a recipe from Preserves: River Cottage Handbook No.2.


The apples are cooked down whole, pips and all, until soft. The pulp is then strained through a muslin cloth (or equivalent) over night. The resulting liquid (thick with pectin) is then cooked with sugar until it sets (this took a bit of convincing!). The result is a light jelly with an enjoyable hint of mint — perfect for roast lamb!

I then moved onto apple sauce. I hunted through my collection of cookbooks, and Canning for a new generation had the simplest and easiest recipe (most of the other ones involved whole days of cooking down the fruit!).

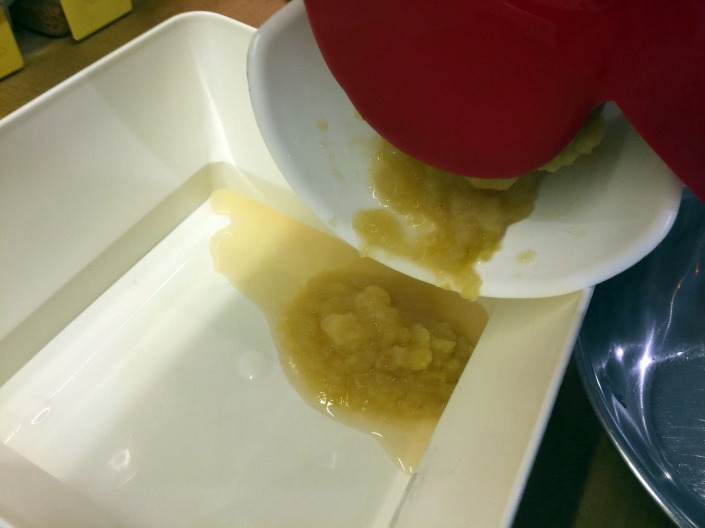
Again, the fruit is cooked whole until soft. It was then passed through my passata machine, which separated out all the pips and skin. The pulp is heated until boiling, and then put into mason jars. These are processed in hot water until properly sterilised.
The final preserve was a straightforward fruit wedges in syrup, using instructions out of Ball Complete Book of Home Preserving. This was the quickest process of all: peel and core the fruit, and cook briefly in a light syrup. Then jar and process in a hot water bath for 20mins.

I’m pleased with my collection of apple preserves, and I’m looking forward to using them throughout the cold winter days to come 🙂
And the storm came pounding in
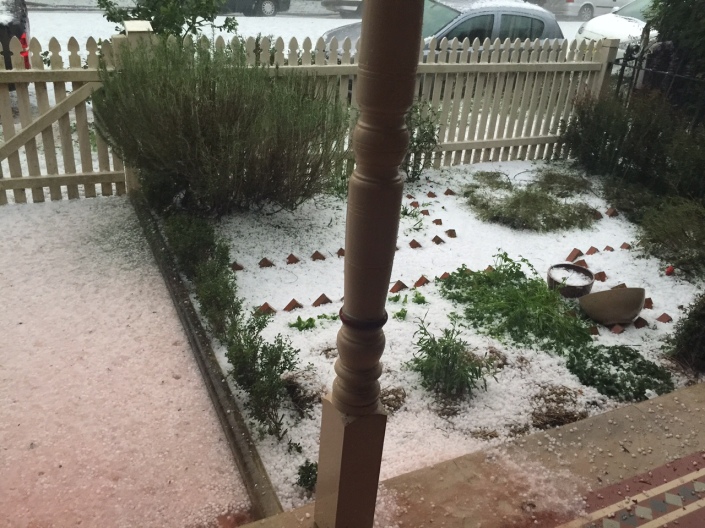
We were glad to make it back before the storm hit. As the sky darkened, rain started sheeting down. We were watching through our back windows when — look — it’s hail! How exciting is that!


The hail kept coming in, pea sized, but overwhelming in numbers. Before long, the ground was white, as if it was a European winter scene.

And then — water — it’s leaking! — and then pouring! into the house through the ceiling. Damn!
It was the ice piling up on the flat roof, and causing the water to flow up, over the flashings and into the ceiling. Up I went onto the roof in the middle of the storm, with a stiff-bristle broom.
For 30mins I swept the hail into piles, away from the flashings and other vulnerable points. The roof simply wasn’t designed for this, and anywhere it could get in, it did.
By the time I came back down, water was still pouring through the light fittings, and we’d been plunged into darkness. Thankfully the ceiling held, unlike some of our neighbours, who had their gyprock ceilings collapse on them while watching TV.


The garden suffered badly. While the big trees were stripped of leaves, the smaller natives shrugged it all off. The vege patch and herbs, however, were destroyed. Pounded into the ground, until a mush.

Some will recover, but some won’t. There goes much of our winter crops…

The life of an urban farmer isn’t an easy one. They say this was a once-in-40-year storm. Considering we’d suffered a once-in-a-decade superstorm (600mm over 48 hours) earlier in the same week, I’m not putting money on it…
Rescuing bees from a rotten poplar tree

A week ago I received a call from Gavin, my bee buddy, about a wild hive in a local tree. The bees had made their home in the hollow trunk of a poplar tree, one of a row of trees that were all marked to be removed as part of a native revegitation activity by Marrickville Council.
The arborists were up for helping remove the hive, as long as some beekeepers were ready to deal with the actual bees.

The starting point was to take off the top of the tree, which the arborist did at the highest point he could reach. The hollow extended past the fork of the tree, and a small number of bees immediately started using their new hive access…
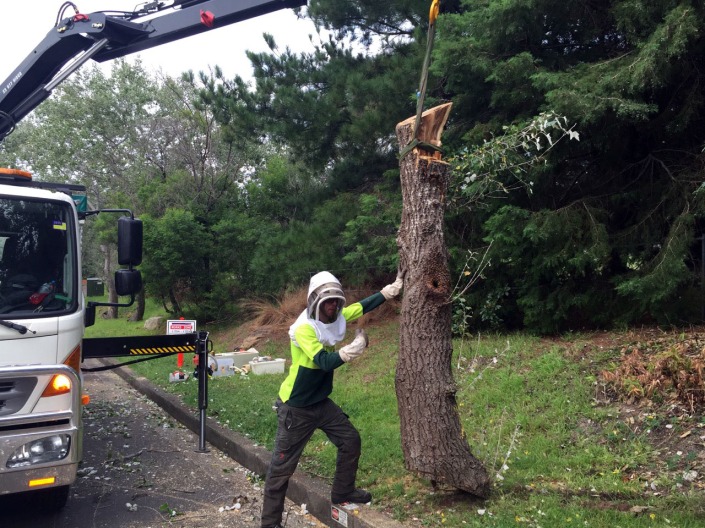
With the support of the on-truck crane, the arborist (equipped with a borrowed veil) cut through the base of the tree. It was then laid down on the ground, read for us to start work.

It was amazing to see how rotted out the tree was, and apparently this is a common problem with poplars. (Of note, there’s research that says that bees benefit from fungi, which assists their immune systems.)
Once the tree was on the ground, I started vacuuming up the bees using a ‘beevac’. This is essentially the same as a sawdust collector that catches material before it gets to the vacuum cleaner, only in this case it’s a collector for bees. (Sorry, no photo of this, I was too busy using the beevac!)
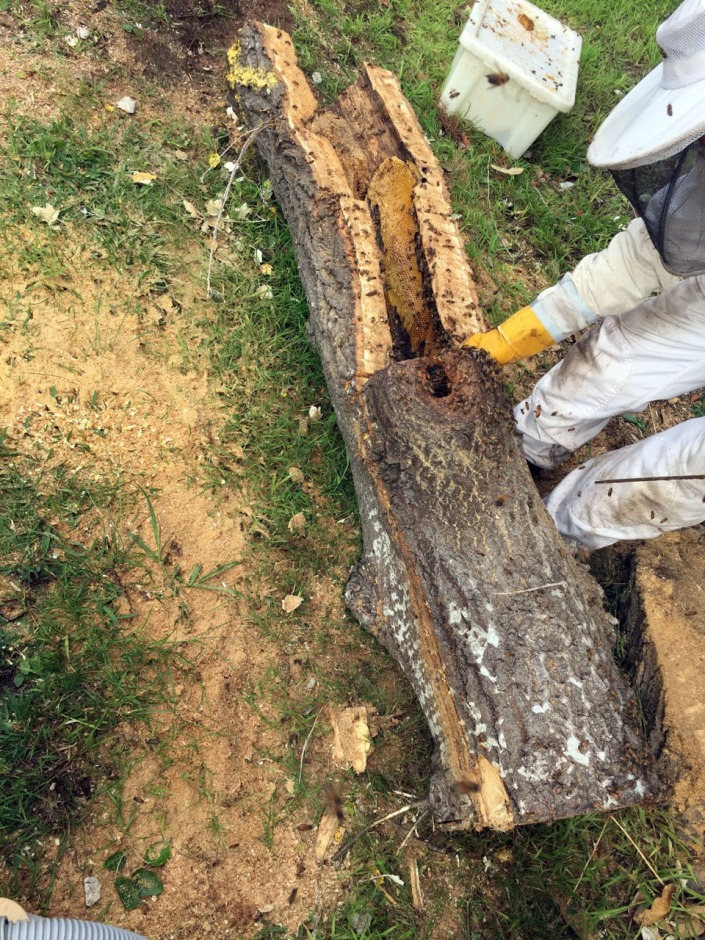
With the further assistance of the brave aborist, we opened up the hive, by chainsawing off slices of the trunk. We were then able to cut out and remove the comb, which was a mix of brood and honey.
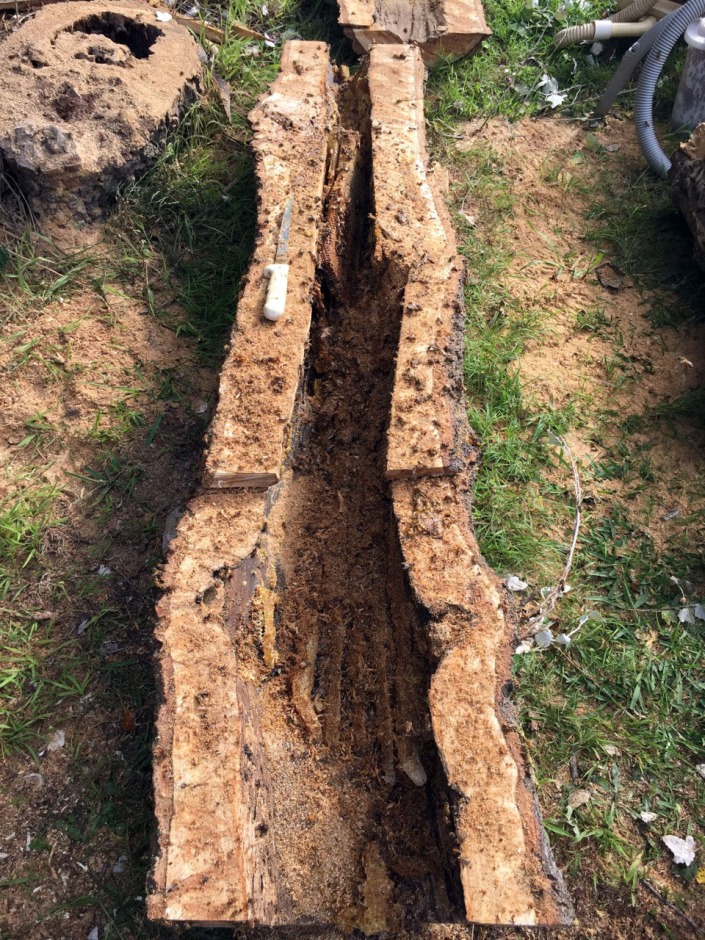
Once we’d worked our way along the full length of the trunk, it became fully apparent how large the hive was. It was a very healthy colony, with no signs of pests or diseases, and plenty of activity.

Once finished, we emptied the box of vacuumed-up bees into a Kenyan top-bar hive, along with the brood comb. We then left the bees to hopefully settle into their new home.
What surprised everyone was how relaxed the bees were. Despite attacking their home with a chainsaw over the period of an hour, they didn’t go on attack. The aborist received one minor sting on his wrist where his glove had pulled up, but there were otherwise no stings at all.
A truly amazing morning, and great experience for a new beekeeper such as myself.
(Postscript: the bees decided they didn’t like their new home, and the flew away the following day. Ah well, at least they were saved from the woodchipper, and hopefully they’ll find themselves another good home. Better luck next time for us beekeepers!)
