Warré hive
We have plenty of beeswax!

This is what 2.5kg of pure beeswax looks like.
One of the many advantages of Warré hives is that the bees draw new comb each season, meaning the wax is harvested as well as the honey. This produces a lot of lovey chemical-free wax!
(If you’re wondering about the strange patterns, this is the byproduct of pouring the filtered wax into containers that have water at the bottom, to stop the wax sticking.)

We do a variety of things with the wax, including hand lotion, home-made fire lighters and candles (of course!).
We still have plenty of wax left over, so knock on our door if you’d like to buy some for your own projects 🙂
Rescuing bees from a compost bin
A week ago I received a call from someone just the other side of Lewisham, saying they had a bee problem. What I found was pretty funny!
Apparently a swarm of bees had taken residence in the backyard compost bin. In an effort to discourage them, the property owners removed the lid. Despite the difficult circumstances, however, they bees kept soldiering on.
The process of rescuing the bees is relatively straightforward. Going in with a knife and hands, the pieces of comb are carefully removed from the hive. They’re then rubber-banded into empty frames.
(You can see a mix of brood — baby bees — on the right, and partially filled honeycomb on the left.)
To encourage the bees to move into their new home, I placed the hive directly on top of the compost bin. Later that night, they apparently all moved into the hive without any complaints.
What’s amazing is that it’s possible to do all this without getting any stings! Despite me literally attacking their hive with a knife, they were relaxed throughout. Phew! (It doesn’t always go this smoothly.)
Last night, the bees were sealed into the hive, ready for their move down to the farm, joining the three hives already in place.
Once they were unsealed, the bees rapidly spread out to ‘re-map’ their new location. Within a few hours, they’d settled down, and this afternoon I did the final clean-ups of the hive, again without any angry bees.
Beekeeping always throws up interesting surprises!
Creating a horizontal Warré hive
I’m a big fan of Warré hives, and I have five in total, with most in Sydney and a growing number at Lewisham Farm down the coast.
When I was first learning from Tim Malfroy, he showed what he called a “coffin hive”, but I’d prefer to call a “Horizontal Warré hive” (much less scary!).
With a little bit of spare time at the end of winter, I decided to make one of my own.

This is basically a Warré version of a Kenyan top bar hive (there’s also a “long Langstroth” that I’ve seen pictures of). It holds the equivalent of three boxes worth of frames, give or take.

It offers some of the advantages of a top-bar hive, such as easy access to the hive, with no heavy lifting. It has an entrance at both ends, which can be used to easily split a hive in summer to create two hives (the second entrance is normally kept closed).
It’s obviously also interoperable with a normal Warré hive, which makes it more versatile.

It’s important that the hive doesn’t warp, otherwise the frames won’t fit. So I constructed the hive from 30mm thick recycled hardwood (mostly Sugar Gum).
I was able to get the wood at half price from the odd-ends pile at my local lumber yard, but it still ran to $403 of materials. So not a cheap experiment, but something worthwhile nonetheless.
Now I just have to catch a swarm, and I’ll be off and running!
I’ll report on how the hive works as the season progresses, watch this space…
The first beehive arrives at Lewisham Farm
The plan for our new farm includes a having a number of beehives, to complement the three we already have in Sydney.
So when I heard through the grapevine that a Canberra-based beekeeper was looking to downsize their collection of Warré hives, I jumped on it. Beekeeping does end up taking quite a bit of time, so its no wonder that many beekeepers end up trimming down the number of hives they keep.

The hive was in a community garden, where it was happily surrounded by vegetables and fruit trees.
Preparations were made the night before the move, putting on a ventilated lid, sealing up the entrance, and strapping everything tightly. It was then just a matter of getting the hive onto the ute, for the 2.5 hour drive down to the coast.

Within ten minutes of opening the hive back up the bees were busy flying around, surveying their new location. While there isn’t a huge amount flowering on the farm (it’s mostly rainforest), we do have several hectares of weeds that will keep them going!

The plan is is to add a second Warré hive, and a Kenyan top-bar hive, and then see how we go from there. And once we get our plantings underway, they will be very happy hives 🙂
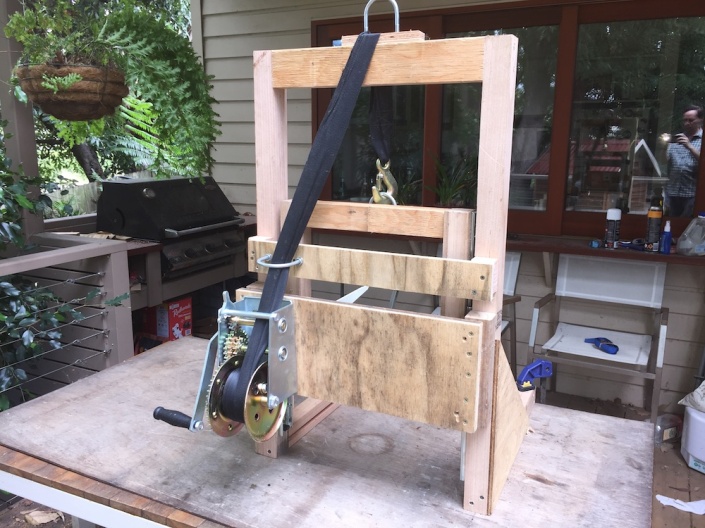
Wooden beehive lifter (version 1.5)
While Warré beekeeping is more natural than conventional beekeeping, there are a few practical challenges.
In Warré hives, empty boxes are added to the bottom of the stack (nadiring), rather than being added to the top. This is great for the bees, as it allows them to naturally keep growing comb downwards. It also eliminates all the management needed of brood boxes in conventional beekeeping.
The downside is that the boxes above need to be lifted in order to insert the empty box. Now maybe this isn’t an issue in Europe, where hives are smaller, but it’s a challenge here in Australia. It’s sometimes necessary to lift four boxes, each of which weight 20-30kg. Heave ho!
Now the boxes can be ‘unstacked’, and then restacked with the empty box on the bottom. This is straightforward when the hive is friendly and relaxed, but I have two hives that are a bit ‘tetchy’. They’re wary when I’m working in the top box, and when I break apart the hive, they go wild, attacking in mass. Not good.
Now Warré outlined the design of a ‘hive lifter’ in his book, and this is shown in greater detail in later natural beekeeping books. So it seemed time to build myself a hive lifter!
Making a wooden hive lifter

The starting point was David Heaf’s excellent page on hive lifters. This outlined a range of designs, and I started with the first one, the guillotine-like design my Marc Gatineau.
I used lightweight Australian native hardwood for the main pieces, and then routed a slot in the verticals to allow the back-piece to run freely. I obtained a small winch from Aliexpress in China, which cost more in shipping than in the product itself.
However, it didn’t run freely. Under the weight of the hive boxes, the guillotine-like mechanism of the backboard running in slots jammed repeatedly. The problem being the tilting force from the lifting arms.
Back to the drawing board.
Version 1.1 took inspiration from Andy Collins‘ lift. To allow things to run freely, it uses drawer runners, which I ordered from I.R.S.

The hive design also uses support brackets for shelving in retail stores, which are amazingly lightweight and strong.
This one worked! At least for a bit, until the supporting plywood buckled under the weight of use.
Versions 1.2 and 1.3 reinforced various elements of the hive lifter design.

Version 1.4 replaced the big ratchet winch with a much smaller and lighter one. The small one is still more than strong enough.
Which I discovered when I over-cranked the lifter when raising a hive, and pulled apart some of the parts with the sheer force of even this tiny winch.
Version 1.5 was further reinforced and tweaked, and is the currently operating version. (Until I made one from metal, which I’ll outline in a future post).
All up, it’s not a complex thing to build, the the cost is no more than $100 of parts, plus a few weekend’s worth of time. (Compared to $1000 for the cheapest comparable commercial offering.)
And it makes an enormous difference when working with hives, particularly during the super-busy summer harvesting season…
Cross-linked comb and a big honey harvest

One of the boxes of honey I harvested over the weekend shows what happens when bees “don’t follow the rules”. This is how they draw comb in the wild, in a space-filling organic pattern.

This is fine for the bees, but a bit of a hassle when harvesting. The only way to get it out is in one big ‘cake’ of comb, which is then cut away in pieces. Which actually proved to be fairly straightforward in practice, thankfully.

In total, I harvested a box of honey from two of my hives, generating a big honey harvest. 15 litres in total, divided up into 3 x 3kg tubs, 3 x 1kg tubs, 15 jars and 3 squeeze bottles.
Considering my 9 litre harvest from last weekend has already been sold out, I don’t expect this harvest will last long either!
Creating an open-source Kenyan top-bar beehive
As a result of a mention in New Scientist, I stumbled across the Open Source Beehive project, which aims to do two things: create simple plans for bee hives that can be used by all, and to design sensors that can monitor the hives.
The core of the project are plans for both Warré and Kenyan (Colorado) top-bar hives that can be cut out a single sheet of plywood. The hives are designed to be produced using a CNC (computer-controlled) cutting machine.
I loved this idea, as it brought together two of my passions: beekeeping and technology.
A CNC-cut Kenyan hive
Kenyan (Colorado) hives are different from traditional hives in that they run horizontally, rather than vertically. Shaped like a horse trough, the bees draw comb on simple top-bars that run across the hive.
I downloaded the plans, and sourced a local company who could cut the pieces, the very friendly Big City Productions in Alexandria.

It’s an amazing thing to see the the fully automated machine work across the sheet of ply, cutting out even the most intricate of pieces. An hour later, the hive was completed. The total cost, including the cost of a sheet of eco-friendly hoop pine ply and the use of the CNC machine, was about $400.
The result is a pile of pieces that beautifully slot together without screws or nails. All that was left to do was to protect the hive with a few coats of linseed oil.

Now for the bees
Only a few weeks later I received a call about a swarm of bees in Ashfield. Hanging from a tree directly beside the footpath, this was a big swarm. It was also rather protective, as attested by the multiple stings I receiving while catching the swarm in a box.
While waiting for the bees to all follow the queen into the box, a mother and her kids walked by. After congratulating me for “looking after the bees, as they’re dying out”, she casually mentioned “and you know about the wild hive?”. Um, no?

Just a dozen metres away, on a major road, she showed me a lovely wild hive in the rotted-out trunk of a camphor laurel tree. I think I caught the prime (first) swarm from this wild hive.

I took the swarm home, and shook it out onto a white sheet, leading up to the entrance of my new Kenyan top-bar hive. What happened next is one of the true wonders of nature: the bees started climbing the sheet, and once they found the entrance to the hive, they started streaming in.
Tens of thousands of bees, all piling into the hive, within the space of 20mins. Amazing!
A vigorous but aggressive hive

From the outset, the hive proved to be incredibly vigorous. Within a few days it was foraging as strongly as my 18-month-old main hive. When we opened it up a fortnight after it was established, half of the entire hive was brood. Within just a few more weeks, it was completely full of drawn comb.
That’s the good news. The bad news was that the hive was very aggressive, attacking me the moment I opened up the hive. It also had a nasty tendency to sting people when they were just walking near the hive.
(That would seem to reinforce the idea that by breeding docile bees, we’ve potentially also weakened them in terms of their vigor and disease resistance.)
While the hive was placed in the land of the former convent, well away from people, it came to the attention of the church. Who — not unreasonably — asked them to be moved to a new home.

By amazing coincidence, a cousin had just completed a beekeeping course, specialising in top-bar hives. (What’s the chances of that!) Living on the far South coast, he was looking for bees to get him started.
So at Christmas I took the hive down South, in my new ute. Where it was handed over to my cousin, for the rest of the trip to its new home in the trees.

I’m pleased to see the hive end up in the hands of someone passionate about natural beekeeping, in such a lovely bushland setting.
Lessons learned
The idea of creating a hive from a sheet of plywood is a great one, and the open-source plans worked well. Since the creation of my hive, the Open Source Beehives project has continued to evolve the plans, resolving a few issues with the original design.
Would I recommend others to use these plans? Absolutely, yes.

The only proviso is this: in Australian conditions, the Kenyan hive is probably too small. It has the interior volume equivalent to 2-3 Warré boxes, which isn’t a lot.
Within 6 weeks of my hive being established, it had already re-swarmed. This was no doubt due to the large size of the swarm, and its strength. I suspect it won’t be the last time it swarms this season.
I’ve suggested to the open-source folks that they consider creating a larger version of the Kenyan plan, perhaps cut out of a couple of sheets of ply. We’ll see if they take up the idea.
Watch the video
While I haven’t ended up with a top-bar hive, it’s been an incredibly interesting journey, from cutting and assembling the hive, to catching the swarm.
I’ve documented this in the video at the top of the post. Enjoy!
Onwards to the next project…
First honey harvest for the season

In Sydney, honey bees never go completely dormant over winter. With not even frost where we live, they can keep foraging on the native plants that flower during winter.
With the two weeks of solid rain at the beginning of spring, absolutely everything is in flower at the moment. That makes for a very strong ‘honey flow’, and abundant early harvests.
Last week I was therefore able to take the first harvest from my main hive. On a very warm Saturday morning, I had the help of a bunch of other local natural beekeepers (organised via the Natural beekeeping in Australian and NZ mailing list.)
The whole top box (8 frames) were totally full of honey, some laid down over winter (dark in colour), and some fresh from recent flowerings (light in comparison). We also harvested two frames from the box below, making 10 frames in total!

Making use of the Sydney bee club‘s honey press, I was able to harvest 13.75 litres of honey. That’s a good start to the season!

That makes for plenty of jars, so give us a yell when you see us about and about, and we’ll sell you a jar or two 🙂
Swarms and more swarms

This blog has been a bit quiet because it’s been full-on swarming season in Sydney. This has made a mess of my plans, as I drop everything and rush off to catch bees.
With such a warm winter, and plenty of early Spring rain, the bees have all decided to spread out to new homes.
So far I’ve caught six swarms:
- Castle Hill: as previously blogged, an easy going swarm in a tree, caught by cutting off the tree branch and shaking into a box.
- Maroubra: also up a tree, but high enough to make it quite a challenge, with success only coming by nightfall.
- Ashfield: a prime swarm (the first big swarm from a hive), from a nearby wild beehive in a tree trunk (more on this one later).
- Beaconsfield: a small wild hive — complete with comb — in a bush (see above). This was in the front of a good friend’s house and after trimming the bush, I was able to shake the bees into a box, then take the remaining comb.
- Next door: a win for my bait hive (see below), catching a good strong swarm.
- Drummoyne: a wild hive high up in a tree — got stung a lot trying to catch it, and still didn’t get the queen — will have to go back for another try.
- Ashfield (again): another swarm from the same tree trunk, this time smaller and very conveniently located at chest height.
Some of the swarms I’ve kept, and others I’ve given to local natural beekeepers who have all the boxes, but no bees (good karma in a future life). I’m sure these won’t be the last swarms of the season…
PS. The next few posts will also be about bees, but I promise we’ll get back to wider eco and permaculture topics shortly! 🙂

A swarm of bees travels from Castle Hill to Lewisham

On Sunday I received a call from a Daniel, fellow beekeeper, to say that a swarm had been reported in Castle Hill.
Since I’m in the market for bees, I dropped everything and headed out North West. (Luckily I’ve been keeping a complete “swarm kit” in my boot for this purpose.)
The property is owned by Ron, who has a single Lansgstroth hive in his front garden. He actually saw the swarm leave his hive, and fly up into the adjacent tree.

While the swarm was a good size, it was 10′ up the tree, making logistics a bit challenging. With the help of Ron, we pulled the branch down a little with rope. I then went up the ladder, and sawed off the branch.

My hive was setup on the ground, with frames in the bottom box, and the top box empty. I shook the bees from the branch into the hive, but a heap of bees were still flying around.
We waited. After 10mins, the number of flying bees was visibly less. After 15mins, pretty much all the bees were in the hive, and I declared victory. The lid went on, and the hive was strapped up for the drive home.
When I got home, I took the bees up on the roof, and opened up the box. Within minutes there was a huge cloud of bees around the house, which was very odd!
As it turned out, the bees swarmed again the moment I opened up the box. And then decided that the bait hive sitting just 50cms away would be much better, and they swarmed into that.
So all’s well that ended well, and I’m the proud owner of two hives of bees 🙂
Now I just need some bees for my new top-bar hive, and for a hive at a friend’s house…
