garden beds
Termites ate our garden beds

Most of our vege patch is constructed using corrugated iron raised garden beds, which look great, and last for a long time.
Here and there we’ve used half wine barrels, to squeeze in some extra space, and to add further visual interest. Painted inside with a sealant layer, they should also last quite a while, or so we thought.
I recently lent on one of the barrels, and one of the planks snapped straight off, revealing that the apparently solid barrels were in fact a tissue-thin veneer of wood:

We know there are termites in the garden, although they’ve never attacked the house in it’s 100-year history. For some reason, I thought that the half wine barrels would be OK, but I was wrong.

Once I dug out the soil, the scope of the damage became apparent (photo above). Clearly these aren’t saveable.
So out they went, replaced by a solid raised bed made out of H4 treated pine (with an inside layer of plastic to keep the toxins away from the rhubarb).
There’s one half wine barrel left, but it’s in the open, away from any fences or other wood sources. We’ll see how long it lasts!

Rebuilding our raised garden beds (the fight against roots continues)

In April 2011, I wrote about our efforts to fight off tree roots that were invading our garden beds. We took the job pretty seriously I think, digging up the beds, laying down bark, weed matting and old carpet.
It didn’t work. Oh, it went fine for a while, and we rested easy. After a year though, the bottom three garden beds became less and less productive, and we knew we’d lost when we started digging up feeder roots from the trees just under the surface of the beds.
Doh! (For those that commented on the original post, I’m not too proud to say: you were right.)
Rebuilding our garden beds
This time around, I decided to put in what I hope will be a permanent solution: garden beds with solid bases.
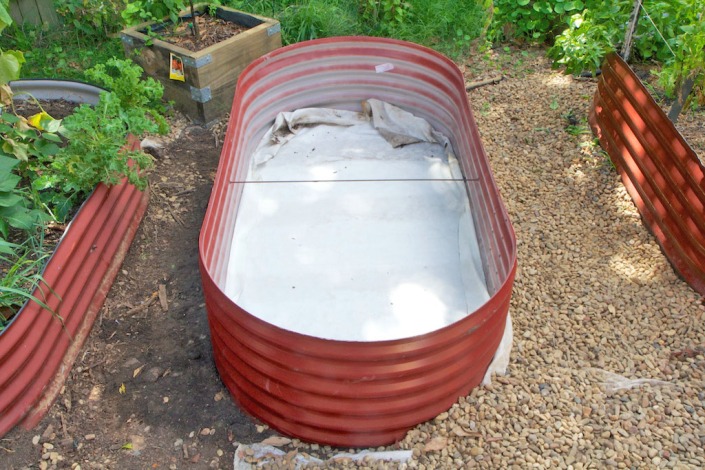
I ordered them to match the current beds in size and colour, but this time with a solid base (basically the bottom half of a water tanks).
We considered creating wicking garden beds, which are an elegant solution. Unfortunately they don’t really match up with our existing watering system, which is designed to provide a small amount of water frequently (via water spikes).
So we decided to create “giant self-draining pots” instead. This is how we did it…

The serious labour at the beginning of the job was to dig out the 1.5 tonnes of soil out of the bed, and to clear away the pebbles around the base. That also surfaced the source of the problems: the multiple large tree roots that had invaded the bed via a small gap in the corner.

I then cut two holes in the side of the tank with a hole saw, for drainage.

These holes were designed to accept a 25mm threaded tank outlet, as follows:

The tank outlets are above the ground level, and will ultimately sit in the pebble bed above a layer of weed matting. I’ll also be connecting the outlets to lengths of 19mm irrigation pipe, drawing the water away, and making it even harder for roots to invade the bed.
With that done, and the bed leveled and in place, the next consideration is ensuring good drainage within the garden bed.
While I could’ve used gravel, it’s heavy to use, and will tend to clog up over time. Instead, I used 30mm Atlantis Flo-Cell, which lays down as sheets across the base of the beds.

Two layers were sufficient to get above the tank outlets, and to ensure good drainage.
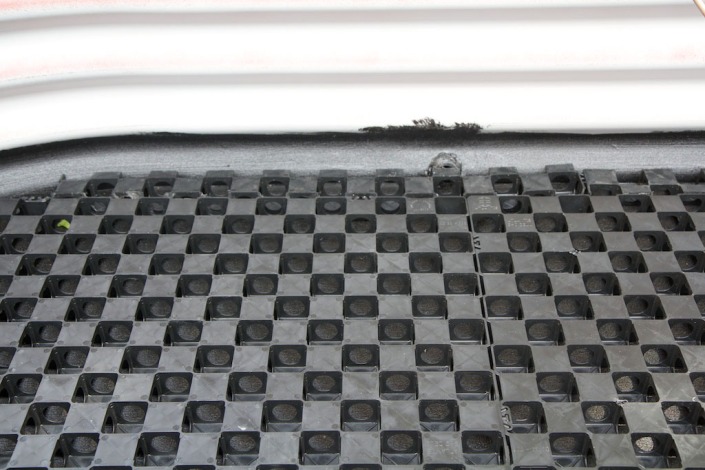
A small amount of gravel was used to plug the gaps, and a layer of geotextile was then laid across it all.
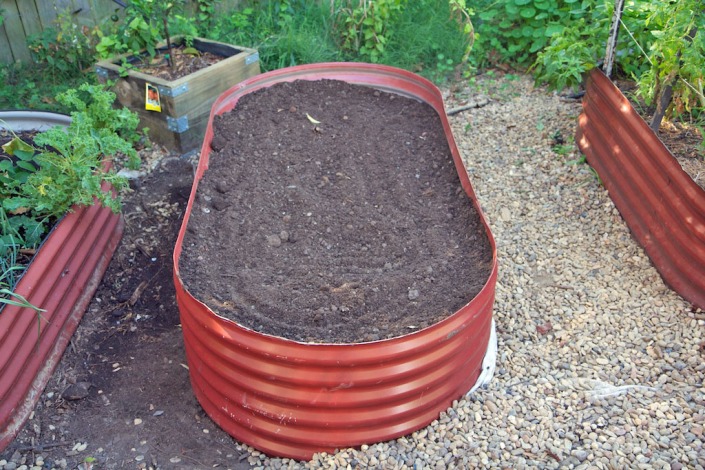
After filling the bed back up with soil, the result looks no different than any of the other beds. But hopefully it will be proof against roots!
Is this a lot of work? Yes, oh yes. At the end of the day, though, there’s no point in having raised beds if they’re not actually growing food.
I’ve still got two more beds to do the same way. So any suggestions on improvements or modifications welcomed!
A new garden bed behind the front fence

Yesterday I constructed a new garden bed, tucked in behind the front fence.
I’m getting reasonably good at constructing these types of raised beds. Start with some lengths of 50x150mm treated pine. Saw off a few pieces to create the ends of the bed. Drill some holes into some wooden stakes, and hammer them in to support the sides of the beds.
Then use coach bolts to attach the stakes to the treated pine. Then bolt on the ends of the bed. The result, a shallow but robust garden bed.
What are we going to plant in this bed?
We received some free strawberries when we ordered our last two lemon trees. Not wanting these to go to waste, they’ll go in one end. The other end will be a mix of edible flowers, a well as pest repellent flowers such as pyrethrum. I’ll post a full list when I sort through all my seed packets…
Three more waiting to go in

Having planted one garden bed, there are still three more waiting to go in, tucked away in the back garden. A veritable flotilla of garden beds!
Corrugated garden beds

I’m a great fan of “no dig” gardening, where garden beds are raised and then filled with layers of organic materials and soil. If nothing else, our earth at the front has turned out to be about 30% old building materials (tiles, slate, whole bricks, pipe, old iron).
There are many ways of creating a raised bed: railway sleepers, wood frames, bricks, hay bales. I decided to go for corrugated iron tanks, for two reasons: they were easy to install, and looked atractive.
Tankworks sells a wide range of garden beds, built to order.
I ordered two, 2m long, 1m wide, 1m deep, the same colourbond colour as our roof.
Some weeks later they arrived, and was I surprised. They were huge! 1m deep turned out to be totally impractical, so with the help of a friend with an angle grinder, they were cut in half.
The photo above is the first of the tanks installed at the top of the front garden (the sunniest spot). Still waiting for soil and cow manure to be delivered…
(And yes, there was still some serious mattock work to dig the trenches, generating a good pile of building rubble in the process. Still, a good break from sitting behind a PC all week!)
