winter
Second citrus patch planted

Following on from our first patch of dwarf citrus, a family work gang has helped us plant out our second patch. This is of full-sized citrus, with supporting guild.
A few notes:
- With full-sized rather than dwarf citrus, patch 2 is a little under twice the size of patch 1.
- The ‘spine’ of the planting are three Elaeagnus Ebbingei a nitrogen-fixing plant that increases the fertility of fruit trees, and is highly-recommended for permaculture gardens.
- There’s a mix of native citrus (eg finger lime), introduced citrus (eg navel orange) and a few that are hybrids of the two (eg sunrise lime).
- I’ve snuck a few berry bushes into the understory on the Eastern side (currants and gooseberry). I want to test how they perform in increasing shade, as well as seeing whether all the fruit is eaten by birds, etc. Consider it a living experiment 😉
- As before, everything is sheet mulched, with a bunch of ‘in-fill’ plants to go in shortly to shade out any weeds.
With Spring coming, lets see how this patch goes!
Home-made wax fire lighters
When browsing Pinterest I came across instructions on how to create home-made wax fire lighters.
With a fair bit of unprocessed wax on hand at the end of the beekeeping season, I was very interested. Particularly for the wood fire down at the farm, in these colder winter months.
I started by melting down a big lump of wax, which you can see contains a fair bit of gunk.

A good friend of ours provides us with big bags of free wood shavings, to use in the chicken coop. I used these to fill up a number of paper muffin cups.

The hot wax then went into the paper cups, the result being (once cooled), a set of unusual-looking fire lighters.

Now I won’t claim that these are as quick and easy as the fire lighting blocks that you can buy. They take a bit of convincing to light, but once they’re going they work well.
They’re particularly effective at restarting the fire each morning, as the coals are still warm from the night before. This primes the wax to light more easily.
If nothing else, these are a great way to make use of available materials that we get for free, namely: wax and wood shavings. Happy days.
First step towards an edible forest garden
As blogged about previously, our long-term goal for our South Coast property is to create an “edible forest garden“, following the books by Dave Jacke.
This week we took the first steps towards this big vision, with the planting of our first fruit trees.
The trees were all transplanted from Lewisham, with the bulk being citrus trees:
- Ruby grapefruit (dwarf)
- Cumquat x 2 (dwarf)
- Meyer lemon x 2 (dwarf)
- Kaffir lime (dwarf)
- Pomegranate (full-sized)
- Aniseed myrtle & Cinnamon myrtle
- Acacia (various, all shrubs rather than full-sized trees)
The plantings were carefully designed in advance to ensure that we get the most out of the trees, with the least maintenance work:
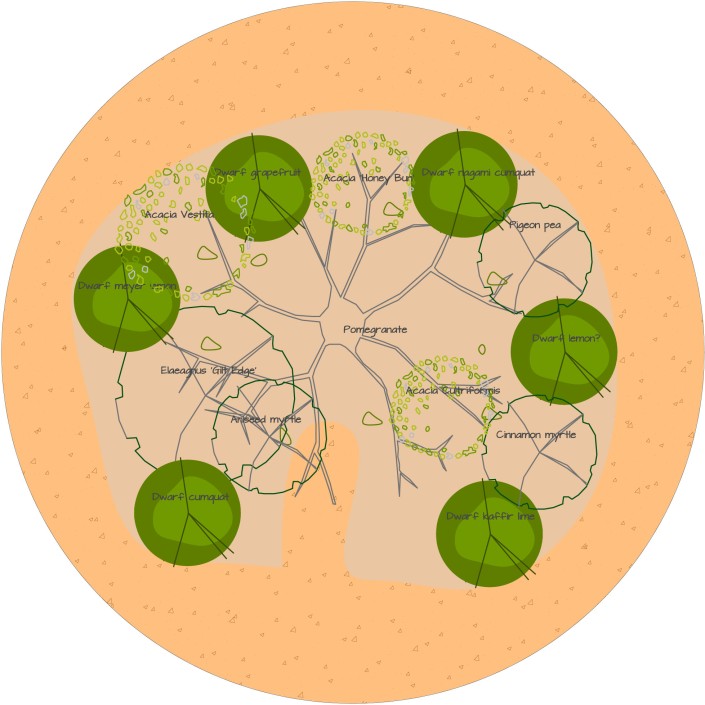
The design was laid out accurately on the ground using triangulation, to ensure that reality matched the plan.

After planting, the patch was sheet mulched, with a layer of cardboard covered by hardwood chip mulch. This should keep the weeds down long enough for the cover crops to do their work.

A few notes on the approach, with references back to Jacke’s book:
- The planting is done in patches, with are then combined to create the overall garden design.
- In this instance, it’s a polyculture patch (design pattern #44 from the book), which is a set of complementary plants that support and assist each other.
- As outlined in our post on citrus guilds, there’s a big focus on nitrogen-fixing plants to support the hungry fruit trees.
- The diagram above shows the eventual size of the trees (which will be some years off), and to achieve this an approach of instant succession (pattern #31) has been taken. This involves interplanting the gaps in the short term, to direct the eventual outcome.
- There are at least three layers in the patch (pattern #38), from ground covers, to the dwarf citrus up to the pomegranate (which while full-sized, is deciduous).
- A lumpy texture (pattern #39) of larger and smaller plants gives better light access, and confuses the pests.
- I’ve used a number of native species (pattern #43), including acacias (for nitrogen-fixing), plus aniseed and cinnamon myrtles (for culinary purposes).
- Underneath all the plants will be a thick ground-cover layer (pattern #49) that will be a mix of flowering plants to attract insects (pattern #42), and further nitrogen-fixers.
- The patch was fenced, with five strands of tensioned wire. This should deter the wallabies and wombats (note I didn’t say stop the animals, as that would be optimistic!).
All the preparation and planting work was knocked off by dad and myself in three days, making it about a man-week of work in total.

Phew! It’s been hard (but rewarding) work this week to get our first patch in place. I’m sure there will be huge successes and crushing failures to come, watch this space!
Yes, we have wildlife challenges in the inner-city

The photos above and below show what were heads of broccoli, almost ready for harvest.
Until the possum decided to have a midnight snack. They were consumed in a single night, so there wasn’t much we could do. (Add to that the ongoing challenges from rats, which will give most things a nibble.)
So yes, even in the inner-city, we have wildlife challenges when growing vegetables…

First honey harvest for the season

In Sydney, honey bees never go completely dormant over winter. With not even frost where we live, they can keep foraging on the native plants that flower during winter.
With the two weeks of solid rain at the beginning of spring, absolutely everything is in flower at the moment. That makes for a very strong ‘honey flow’, and abundant early harvests.
Last week I was therefore able to take the first harvest from my main hive. On a very warm Saturday morning, I had the help of a bunch of other local natural beekeepers (organised via the Natural beekeeping in Australian and NZ mailing list.)
The whole top box (8 frames) were totally full of honey, some laid down over winter (dark in colour), and some fresh from recent flowerings (light in comparison). We also harvested two frames from the box below, making 10 frames in total!

Making use of the Sydney bee club‘s honey press, I was able to harvest 13.75 litres of honey. That’s a good start to the season!

That makes for plenty of jars, so give us a yell when you see us about and about, and we’ll sell you a jar or two 🙂
Making bee hive boxes: getting ready for a busy spring

Spring is a busy time for beekeeping, so it pays to be prepared. And with a warm winter, and a week of much-needed rain, there’s every sign that things will be taking off early this year in Sydney.
So for the last few weekends, I’ve been making bee hive boxes, hive lids, plus extra bases. (All for Warré hives, otherwise I could just buy new boxes.)
For the boxes, I’m finger jointing them, using the new jig that I’ve purchased for my router table. As first attempts, they’re not great joints, but practice makes perfect! The bees will plug up any gaps with propolis in any case… 😉
My plan is also to scale up this year, so I have enough honey to meet the needs of our two local cafes.
In addition to a few more hives at our house, several friends have expressed interest in having a hive in their backyard. So I’ll be doing all the setup and management, and we’ll put in place a produce-sharing arrangement. 🙂
Onwards to spring!
Drying tumeric and lemon
A month ago we harvested a huge amount of tumeric, 2.6kg in total. That’s a lot of tumeric.
Some we’ve frozen, and a lot is stored in our cool cupboard. Following some inspiration from Milkwood, I also decided to dry some, to see how well that would keep.

We’ve had a dehydrator for a while now, so we filled up two layers with sliced tumeric.

While we were at it, we also set up two layers of sliced lemons, following a suggestion from the excellent book Homegrown tea by Cassie Liversidge.

24 hours later at medium heat, the results were ready to jar up. Very pretty they look too! More importantly, they’ll hopefully keep for quite some time, and we can compare against our other forms of preservation…
Growing (and harvesting) our own tumeric

A few years back, our neighbours from down the road offered us a few pieces of tumeric from their recent harvest. Following the “why not, let’s give it a go” principle, I planted these into two potato bags.
They grow vigorously, as the photo above shows. Following instructions on the net, I let them die back over the first winter.

They came back strongly during the following summer, and when they died back for the second time, it was time to harvest. And what a harvest it was!

The easiest way to harvest the tumeric was to up-end the two potato bags, and to rummage around in the soil. As you can see from the photo above, the tumeric emerged as thick clumps of bright orange tubers.

In all, we harvested 2.6kg of tumeric (!), which sounds like a lifetime supply to me.
Half has been peeled and frozen, for long-term use. The other half has been stored in the cool cupboard in a sealed container. We’ll see how both lots go over time.
One potato bag has been replanted with some of the tumeric, for harvesting in a few years time. (From this year’s experience, I don’t think we’ll need two bags worth!)
Would anyone like some tumeric? 🙂
Our winter harvest of broccoli and cauliflower

Our main winter crop most years is broccoli and cauliflower, and it’s in full swing right now.
The main head has been cut off the broccoli plants, and we’re steadily harvesting the side-shoots. The cauliflower is also a sight to behold.
It’s great to eat seasonally 🙂
Two bait hives ready for spring

One of the ways of increasing the number of active bee hives is to wait for a call that someone has a swarm clustered in a tree in their backyard, and to capture that.
The other option is to place “bait” hives in inviting locations, and hope that a passing swarm takes a fancy to them.
In my first full beekeeping season, I’m going to try both. 🙂
The photo above shows two bait hives ready for spring. I made the boxes myself (as per my previous post), and painted them a very pale green. I also made the two bases, which are a bit rough, but sufficient for this task.
As these are temporary hives, there’s no reason for a full Warré roof, and I’ve constructed a simple flat roof out of plywood, treated with linseed oil.
Now I just have to wait until spring, and then find some friends who are willing to provide a temporary home for the hives, in return for some honey and/or wax. 🙂
Update: see my review of Swarm traps and bait hives, and how it changed our bait hive approach.
