water tanks
Putting in place the basics of farm infrastructure
As you can see from the “before” fly-over, our farm came with a lovely farmhouse, but not much else! Certainly not enough considering we’re totally off-grid in terms of power, water and sewage.
So while we’ve started planting out the first few patches of the edible forest garden, the focus has been on getting the basics of farm infrastructure in place.

The centrepiece of these efforts has been the new farm shed (aka “the barn”). The local council required us to position it away from the road, so it ended up half-way down a slope.
Echoing the design of an American barn, the shed is 10.5m wide and 7m deep, with a big 3m x 3m central door for the tractor.

Since the barn is now in the middle of a field, a new internal driveway was required. Befitting the location of the house, we decided to go all-out to create a pretty road.
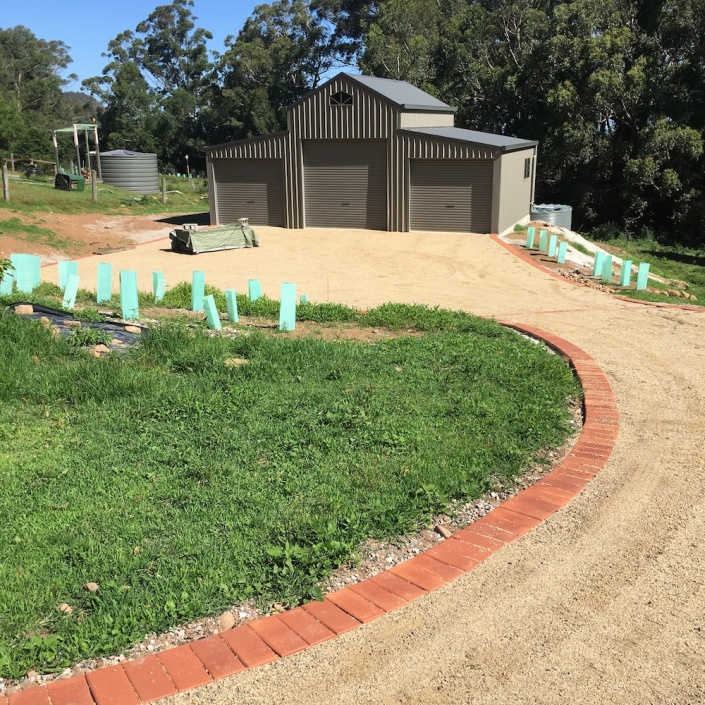
This meant a road surface of crushed granite (on a solid road base), with brick edging (on a concrete edge laid alongside the full length of the road). With Priscilla’s keen eye for aesthetics, we laid the road out with elegant “swooping” curves. We put a single car-parking spot in front of the house, plus a large parking area in front of the barn.

The final phase was the addition of two 22,000L plastic water tanks below the barn, to catch the run-off from the roof. This triples our overall water storage.

Oh, and with the barn in place, I was able to purchase a brand-new 46hp Kubota tractor, which will be vital in reshaping the property 🙂
This is, however, still just the start of more work needed on the basic infrastructure. Activities yet to be done:
- One final water tank on high ground, which we’ll switch to using for the house, plus the garden. That will get us up to about 100,000L in total.
- A water pipe laid from the barn tanks (at the bottom of the property) to the new water tank (at the top), with a solar pump used to get the water up the slope.
- A power line run to the final tank, for a good-sized pump.
- A vegetable patch and greenhouse, with a water line run from the tank.
Phew! Still, a lot of this can be done with the new tractor, and everything is more fun with a tractor 🙂
Cleaning the gunk out of our water tanks
It’s coming up on eight years since we installed our first 5000L water tank, put in during drought conditions. Since then we’ve added two more tanks as part of the renovation.
Over Christmas, when we had three dry months, our tanks dropped to nearly empty. They also started to stink, clearly the results of anaerobic decomposition of the plant material washed off our roof. Smelly water feeding into the washing machine, not good!
Our setup has first flush diverters, designed to capture the first lot of dirty water that flows into the gutter. They’re not magic, however, and gunk still gets in to the tanks, and builds up over time.
In the country, where households have to rely exclusively on their water tanks, it’s routine to get them cleaned out every while. I haven’t heard of it being done in the city, however. This might be because most of the tanks were put in at the same time as us, or later, and the problems are only now starting to emerge.
When we were out at a country show, we collected a business card from Leigh’s water tank cleaning, who we talked into dropping by our place when he happened to be heading into the city. We also talked to the Water Tank Cleaning Company who operate throughout Sydney (their website was down at the time of posting).

Leigh was very friendly, the the process is surprisingly simple. It’s basically a hand-manoeuvred version of a pool cleaner, which is steered around the base of the tank where the gunk has accumulated.

It’s somewhat horrifying to see how much dark brown water gushes forth. No wonder our water filters kept getting clogged up, trying to deal with all that!

It’s a quick process, and within half an hour, our two main tanks were done. That should keep them going for a few years…
Lewisham House is featured today in the Sydney Morning Herald
The news is that Sydney Water has decided that it doesn’t need to save any more water, and that programs for schools, businesses and schools can be shut down. It’s an extraordinary decision, made with the full knowledge that Sydney will only be getting drier in coming years.
Our house was the featured “human interest” angle for the story, and a video person came around yesterday to film me watering the garden and talking about why we put in our water tanks. All good fun!
You can see the video here, including shots of our water tanks in full operation during a brief thunderstorm:
Update: I’ve just discovered that we’re on page 2 of the printed newspaper, and there’s also a second article online that includes more about the house:
Water-wise water spikes

A key element of our watering system, fed by our rainwater tanks, are the “water spikes” used in the beds themselves. I was sure we’d written about these when we first put them in, 3+ years ago, but I can’t find a post for them. So here it goes…
These spikes are traditionally used with grey water systems, as they have two pairs of drainage holes 10+ cms down (the regulation depth for grey water usage). According to our plumber, one spike feeds about a circle about 1m in diameter. To be on the safe side, we’ve got three for each raised bed. (We’ve also strategically used them throughout our new native garden at the back.)
The big advantage of this watering approach is that practically no water is lost to evaporation, as it all goes sub-surface. It also encourages plant roots to seek downwards, strengthening them again dry and hot days. It’s robust against blockages, as any sediment simply falls to the bottom of the water spike.
We had a whole bag of spikes supplied as part of our water tanks, already made up. But you can also make them yourselves, as follows:
- orange water spike (our plumber called it a ‘carrot’, for obvious reasons)
- 25mm end cap (standard item for 25mm polypipe watering systems)
- 3.5mm hole drilled in the top of the cap
- standard 4mm elbow inserted (heat the cap in hot water first, and use pliers)
This creates a ‘watering unit’, when then connects to standard 4mm polypipe (used for drip feeds, etc).
I’ve seen the ‘carrots’ available per piece in Bunnings, along with the other required bits. You can also get them in bulk at Reece.
Combined with a timer system and a network of 19mm polypipe, this is a great set-and-forget watering system for all our plants. We love it, and would recommend it to others.


Finally some rain!

It’s been a long time coming. As an “inner-city farmer”, rain becomes an important thing, closely watched and hoped-for.
The main vege patch has a watering system, but the tanks ran dry a week ago (all 10,000L), forcing us to switch to mains water.
The food forest at the back relies on rain. And there hasn’t been rain of substance for six months now, leaving the ground parched and the plants struggling.
Finally, it rained last night, as shown above. And it’s kept raining today, heavily at times.
Rain on Christmas Day, not normally considered a good thing … but great for the plants. We’re relieved.
Our third (and final) water tank went in this week

One of the first things we did when we purchased the house was to put in a water tank, to allow us to grow our own food despite the water restrictions in place at the time.
The renovation gave us an opportunity to expand our water capacity. The easy step was putting in a second 3,100L water tank in beside the first, at the side of the house. Since this one could just be connected to the existing tank, it’s pretty cheap (no pumps, plumbing, etc).
The last water tank was a slimline tank, put in to address our overflowing gutters. With the extension finished, we had 150 square metres of roof feeding the back gutter, and with a single downpipe, it would get overwhelmed in heavy rain.
The slimline tank on the other side of the house allowed us to put in another downpipe. By connecting the new tank to the existing tanks, the water level equalises between them, adding 1,500L to the total capacity.
So that’s 9,700L of water capacity, split across three tanks in two different locations, with just one pump. Not too bad!
This diagram shows how it all fits together (click to see a larger version).

Visit our house (and others) on the next Marrickville Council WSUD tour

Marrickville Council has organised another Water Sustainability Urban Design (WSUD) tour in the local area, and we’re one of the stops.
The purpose of these tours is to show local residents some of the many ways of saving water. In our case, it’s our water tank, irrigation system, and permaculture garden sufficient to meet our vegetable needs.
To book, download the poster, ring Marrickville Council on 9335 2222, or email water@marrickville.nsw.gov.au.
See you on the day!
Becoming a sustainable water ambassador

When we put in our water tank early last year, we received a rebate from Marrickville Council, which was much appreciated. This also started a dialogue with the water folks at the Council.
As a result of this, I agreed to become a “Sustainable Water Ambassador”, and the details on this have just gone live.
There are details on the overall programme, as well as the poster (PDF) showcasing what we’ve done.
So far this hasn’t involved doing much, although we were one of the stops on a local tour of water sustainable houses. I’ve also been invited to be a member of a Council working party on sustainability, which should be interesting.
Plenty of rain, but to no avail
It’s very frustrating. It’s absolutely pouring down at the moment, flooding the street and the garden, but the water tank is barely filling up.
So we’ve spent the money, and put in a great tank. What it now highlights is the problems with the existing house.
In particular:
- The side gutter is hanging off the house at a funny angle, and is full of holes. So more water goes off the edge of the gutter than into the tank.
- At the back of the house, the gutter consistently fills up with leaves, due to the poor design.
- Some madman also put in two right-angle joints to the downpipe, which almost immediately block with leaves.
We’ll have to tackle this in two stages. The first step is to replace the side gutter with a new Smartflo gutter, must get this done in the next few weeks.
I have fewer options at the back. With a planned extension in the pipeline, it doesn’t make financial sense to replace the gutter. So I think I’ll:
- get some cheap leaf guards
- get our handyman to bodge some new downpipes, getting rid of the crazy right-angles
It all seems so simple in the brochure, just another thing to be aware of when retrofitting a water tank…
Water sustainable urban development: tour through Marrickville
I spent an enjoyable morning today, visiting local houses who are saving water in interesting ways, as well as looking at some “rain gardens” in the street. (Our house was also the last stop on the tour, showing off what we’d done in the garden.)
The Water Sustainable Urban Development (WSUD) tour was organised by the “water revolution” staff at Marrickville Council. Not knowing what to expect, I was pleasantly surprised. It was hard to tell who were more passionate, the householders installing the water tanks, or the folks on the tour!
A few highlights:

The first stop was Graeme’s house in Marrickville. This showcases a significant project (8 months in length) to install a pair of 5,000L water tanks at the bottom of their large, and heavily sloping, garden. The tanks were then plumbed into the house, for absolutely everything other than drinking water. The cost was actually pretty reasonable, and the duration of the work was I think due to Graeme doing a lot of the work himself, presumably on weekends.

Something I hadn’t seen before was the pressure accumulator tank. About the size of a gas bottle, this holds water at pressure. This means that if a small amount of water is required in the house (washing hands, etc), the water is drawn from this holding tank, without the pump having to come on. This reduces the electricity required, and presumably helps to prolong the life of the pump. I’ll definitely have to look into this for our house.

The Hill Street rain garden was extremely interesting. This takes the normal storm water that runs of the street, and passes it through this mini wetland. The goal is not to store the water, but to filter it through the plants, which are grown on top of several layers of sub-surface material.

The end result is cleaner water going into the waterways, with a lot of the sediment, rubbish and nitrogen stripped out. I think it also makes for an interesting take on street-side gardens. Would love to see more of these go in throughout the Inner West.

John Caley, who ran the water course I attended some months back, had a house that certainly met expectations. Plenty of careful design of water tanks, and a nice use of water off next door’s roof (with their permission!). What took my fancy, however, was their lovely little communal garden in the small laneway beside the house. Plenty of produce to share amongst the neighbouring houses.

Mike and Jen’s house had everything that an inner-city greenie would want. Water tanks, careful management of water runoff, and chooks. Oh, and a nice vegetable garden squeezed into their small back garden.
Thanks to Maggie for organising the day! Visit the Marrickville Council water pages to find out more on future events, and how to get involved.
