bees
Swarms and more swarms

This blog has been a bit quiet because it’s been full-on swarming season in Sydney. This has made a mess of my plans, as I drop everything and rush off to catch bees.
With such a warm winter, and plenty of early Spring rain, the bees have all decided to spread out to new homes.
So far I’ve caught six swarms:
- Castle Hill: as previously blogged, an easy going swarm in a tree, caught by cutting off the tree branch and shaking into a box.
- Maroubra: also up a tree, but high enough to make it quite a challenge, with success only coming by nightfall.
- Ashfield: a prime swarm (the first big swarm from a hive), from a nearby wild beehive in a tree trunk (more on this one later).
- Beaconsfield: a small wild hive — complete with comb — in a bush (see above). This was in the front of a good friend’s house and after trimming the bush, I was able to shake the bees into a box, then take the remaining comb.
- Next door: a win for my bait hive (see below), catching a good strong swarm.
- Drummoyne: a wild hive high up in a tree — got stung a lot trying to catch it, and still didn’t get the queen — will have to go back for another try.
- Ashfield (again): another swarm from the same tree trunk, this time smaller and very conveniently located at chest height.
Some of the swarms I’ve kept, and others I’ve given to local natural beekeepers who have all the boxes, but no bees (good karma in a future life). I’m sure these won’t be the last swarms of the season…
PS. The next few posts will also be about bees, but I promise we’ll get back to wider eco and permaculture topics shortly! 🙂

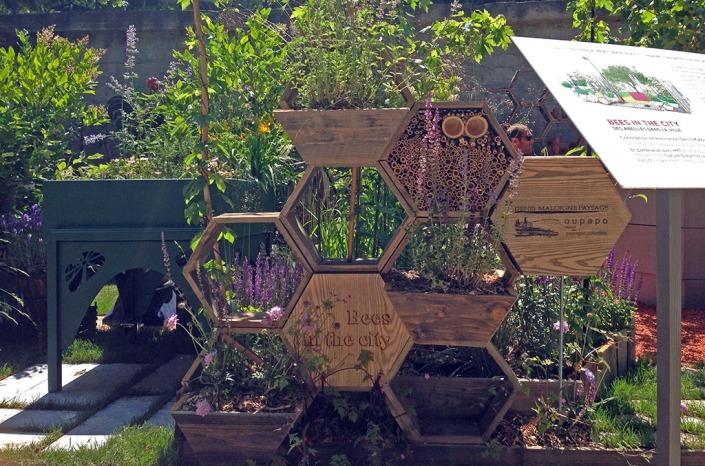
Insect hotels are all the rage

Priscilla’s recent work trip took her around the world, and across Europe. Taking a break in a park is always a great way to get over jetlag, and in the process she stumbled across a number of marvellous insect hotels.
The one above was in Warsaw, while the big art/environmental installation below was in Paris.
They’re clearly in fashion at the moment, and they put our insect hotel to shame!
A post by Gerry to the natural beekeeping list also highlight this great Bee walls, habitat and nesting blocks (PDF) resource.
The more the better I say 🙂
This is what bees do in a natural setting
If you wanted to know what bees do in a natural setting, watch this video! It’s extraordinary to see how quickly bees fill up a vertical log with comb, just 11 weeks after the swarm initially arrives. Truly inspiring.
Gaiabees says this about the vertical log hive:
The vertical Log Hive allows us to observe the growth of comb and the downward gesture of the “Bien”. It “descends” from the aerial ocean towards the earth, leaning itself downwards, from within the space of “in-between”. The objective was to imitate feral nest conditions and observe the initial incarnation & growth. Further, the set up and log design provide feedback information for instinctual preferences of Honey Bees and future nest designs.
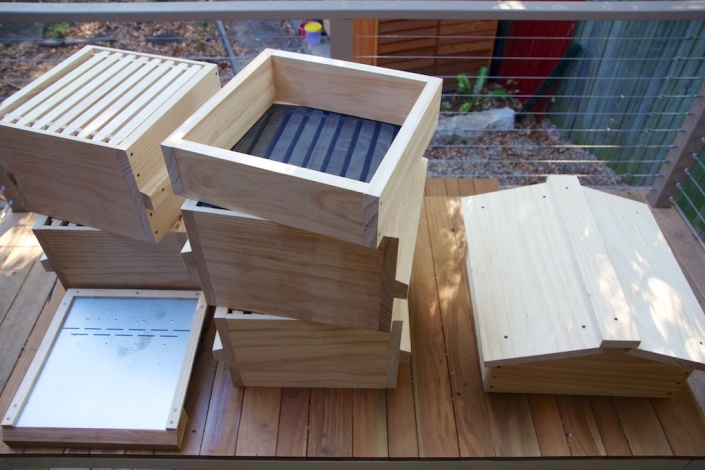
Making my own Warré bee hives

When I started with beekeeping at the beginning of the year, I purchased a set of Warré bee hives from Natural Beekeeping Australia (Tim Malfroy). These are lovely, and made out of 22mm Macrocarpa Cyprus, they’re built to last.
In the quiet winter, it’s a good time to plan for the coming spring. I’m hoping to add a second bee hive to the roof, and so a second set of boxes are required. After some helpful advice from Tim, I decided to make my own.

The first step was to rout a 11mm x 11mm rebate into the sides of the boxes, for the frames to sit into. I borrowed a router off a friend, and even with no prior experience, I had the rebates done in about 30-40mins.

Some careful cutting with my circular saw produced the first set of box sides in the first hour, after a bit of initial stuffing around.

After a quick dash to the nearby Bunnings to get some clamps big enough to hold the box together, I had the first box screwed together.

Repeat three times until a complete set of boxes is created! All that’s left is the base, roof, and quilt box.
The completed set of hive parts is shown in the first picture in this post. From a standing start, and with a lot of on-the-job learning, the whole process took about 2/3 of a day. It will be a lot quicker next time around!
All that’s left to do is to install a Beeltra trap in the bottom and paint the hive. 🙂
Materials used
- 10.8m of 240×190 radiata pine (6 x 1.8m)
- 6mm marine ply (small amount)
- 15mm ply (small amount)
- recycled hardwood (small amount)
- approx 40 of 8g x 35mm square drive screws
- approx 150 of 8g x 65mm square drive screws
The radiata pine was the only material I was able to easy source locally. So while it’s a bit thinner and less robust than the cyprus used by Tim, it’s still fine (it’s painted to protect it from the elements). The key thing is to ensure the interior dimensions are 308 x 308 mm, so the frames fit.
I used some left-over ply to make the base and lid for the hive.
The total cost of materials was approx $120.
Tools needed

These were the tools I used for the job:
- circular saw
- router (borrowed from a friend, in my case)
- impact driver (electric screwdriver would be fine too)
- 4 clamps
- combination square
- builder’s pencil
- glue for joints
- tape measure
- safety glasses
- ear muffs
This is pretty much a set of standard tools for the typical DIY’er. Using a circular saw for accurate work is a hassle, but possible. It would be much easier with a good-sized mitre saw, or bench saw.
To end on a very geeky note, making your own hives as a new beekeeper feels like a young jedi making their first lightsabre 😉
A natural home for native stingless bees
We’ve had native stingless bees for several years now, and they live very happily in their small home, complete with a tin roof.
When we visited Sydney’s botanic gardens a few weekends ago, we were very impressed with their super-natural home for bees:

I’m reliably told that the hive on the right is currently empty, awaiting an enthusiastic swarm from the active hive to populate it. Which only leaves the question: how did they get the bees into the first hive?
I’d love to have this sort of log home for our native bees, so I’ll ask around to find out more…
First check on our honey bees
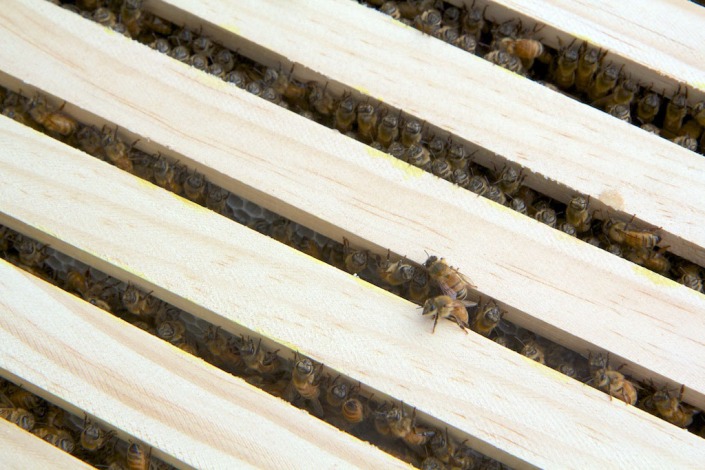
It’s been a week since the package of bees was introduced into the hive. Had the queen been successfully freed? Was the hive progressing as it should be?
After a week, I could wait no longer. With a warm morning, and the bees busy foraging, I opened up the hive.

In just a week, the bees have constructed clean white sheets of comb on all the frames. The longest of which is already almost to the bottom of the box.
No brood (new bees) as yet that I could see, but it’s early days. As a complete novice, it’s hard for me to know whether all is well, but I’m taking what I saw as a good sign 🙂
(PS. apologies for the restricted photo above. The comb is very soft at this early stage, and surprisingly heavy. So I had difficulty easing out the frame with one hand, while holding the camera with the other.)
As always, the bees were busy but unconcerned about my presence. There was no need to smoke the hive, and I wore my hood but not my gloves. Touch wood, still no bee stings!
We have bees!

(This is the 5th in a series of posts about Bringing honey bees to Lewisham House.)
When we set up a Warré hive on our roof, we were hoping to capture a roving swarm of bees. This would’ve been the most “natural” way to start a hive, but it wasn’t to be. (Sydney has been incredibly dry this summer, so that’s perhaps been the problem.)
So we put in an order for a “package of bees” from Hornsby Beekeeping Supplies. Last Friday we received a call to say they had come in, and we drove to Hornsby on Saturday morning to pick them up.
A “package” of bees is an interesting concept for a novice! As you can see above, it’s a box about the size of a briefcase, with sides of flyscreen. There are approximately 5,000-6,000 bees in the box (!).
They’re not visible in the picture above, but there’s also:
- a small plastic cage containing the queen bee
- a large tin in the top of the box, containing sugar syrup for the bees to eat
My new beekeeping buddies were away on holidays, so I watched a bunch of YouTube videos to work out what to do 🙂
The process is fairly simple:
- make some space in the hive by temporarily removing some frames
- take out the can of sugar syrup
- take out the queen bee
- pour the bees into the hive (yes, I mean pour!)
- put the queen into the hive
- put the frames back in
- put the lid on
The following video gives a pretty reasonable idea of what’s involved (although thankfully we don’t need to worry about the electric fence to keep the bears out in Lewisham!):
I waited until late in the day, and then followed the steps to put the bees into the hive. I put on most of my protective gear, but left my gloves off. 15 minutes later, job done, no bee stings!
The bees are very docile, mainly because they don’t yet have any territory to protect. They were flying and crawling everywhere, but didn’t want to attack me.
What happens now? The queen bee is kept in her cage by a plug of sugar. The bees eat through the plug and release her in about three days, and by then they should’ve bonded. Then they start setting up the hive, and creating the honeycomb.
All very exciting! We can’t wait for our first honey, hopefully at the end of this season 🙂

Bees are the new black
We’ve been on holiday in Tasmania for the last two weeks, and this has given us a chance to catch up on our light reading, including recent editions of cooking magazines provided in the various hotels.
Bees, it seems, are the new black, at least amongst the trendy restaurants and avant-garde chefs.
This is what Gourmet Traveller had to say:
Ladro’s Fitzroy and Prahran restaurants were amongst the first in Melbourne to trial hives almost 18 months ago, put there by Melbourne City Rooftop Honey, a company that has since brought trouble-free bee keeping and specialised honey to more than 15 city restaurants. “I loved the idea of having bees from the start,” says Ladro co-owner Ingrid Langtry. “Not just because of the idea of being able to serve honey 10 minutes after it’s been collected from the roof but because it helps to sustain the bee population and, I guess, the security of our pollinated food.”
Rooftop Honey also gets a write-up in Feast magazine, while Malfroy’s Honey is featured as a key ingredient in a sumptuous rolled pork belly recipe.
It seems that everyone is getting into the act, with hives finding homes in unlikely locations throughout the urban environment. Who knows how many urban hives there are now, hidden away from casual observation!
Hopefully we’ll have Lewisham Honey to add to the mix by the end of summer. 🙂
Getting starter strips in place for our Warré hive

(This is the 4th in a series of posts about Bringing honey bees to Lewisham House.)
Like conventional bee hives, Warré hive uses ‘top bar’ frames. The difference lies in how the frames are used.
In commercial beekeeping, the frames have a wax ‘foundation’ that is wired into the frames. This gives the bees a starting point for building honeycomb, but forces them to conform to the rigid spacing of the foundation. Once filled with honey, the tops are cut off the honeycomb with a hot knife, and the honey is spun out in a centrifuge.
In contrast, ‘natural beekeeping’ in a Warré hive allows the bees to grow completely fresh honeycomb. This allows them to create cells of differing sizes, to match their particular needs. When filled with honey, the entire honeycomb is then cut out, and drained of honey. Next season, the bees start again from fresh.
This is the most natural way of raising bees, and there are many potential benefits in terms of disease management (honeycomb is not repeatedly used with the potential for diseases to remain from season to season).
Left to their own devices, however, the bees could end up creating honeycomb in any way within the hive boxes. This can make it impractical to get out the combs, for inspection or harvesting.

The practical compromise is to add a ‘starter strip’ underneath the top bar of the frame. This consists of 1cm-ish of foundation, glued into the bar using melted wax. This heads the bees in the right direction when they start creating the comb.
It took an hour or so for my novice’s hands to get the strips in place for the first two boxes worth of frames. But with that done, and the hive painted, everything is now up on the roof ready for bees.

Picking up our new Warré bee hive
(This is the 3rd in a series of posts about Bringing honey bees to Lewisham House.)
Instead of getting conventional bee hives, we went down the route of Warré bee hives and so-called ‘natural beekeeping’. So what’s all this about?
Warré bee hives, also known as the “people’s hive”, are a little different from conventional hives:
- they’re smaller in cross-section, to make them closer to the natural dimensions of the hollow trees that bees normally live in
- the bees are allowed to grow natural honeycomb, rather than using
- there’s a quilt box at the top of the hive, to keep warmth in over winter
- empty boxes are added underneath, rather than on top, to minimise disturbance to the bees
- (plus various other changes and tweaks)
This sits within the broader philosophy of ‘natural beekeeping’, which focuses on:
- minimising the number of disturbances of the bees (Warré hives may be opened as few as 2-3 times per year)
- creating the most natural environment for the bee
- supporting the bee’s natural biodiversity and defences
- working with bees in a way that is ethical and sustainable
(This is my quick, layman’s summary. Much more is written on Tim Malfroy’s Natural Beekeeping Australia site.)
When it came to our new hive, it was made by Tim and delivered to a pick-up point in Sydney. When I arrived, there were over a dozen hives going to destinations throughout Sydney, so it seems that natural beekeeping is making its mark. Very exciting!
As shown in the picture above, there’s a lot of elements of a hive, including:
- base for the hive, incorporating a small beetle trap
- four boxes, two of which are used initially
- bee excluder (basically a square of flyscreen)
- smaller box containing the ‘quilt’ (a fabric pillow containing wood shavings, etc)
- wooden cover board
- roof that goes over it all
- Emlock strap to hold the hive down
The boxes and roof were then painted with a white “natural paint”, sourced from The Natural Paint Company (tell them you’re a beekeeper and they’ll know what you need).
We’re getting close now! The next post will talk about preparing the hive for bees.
