gardening
Front-yard veges nurture a sense of community

At a recent dinner party, good friends of ours were complaining that they don’t have any real sense of community where they live. They don’t tend to talk to the neighbours, and don’t connect up with other locals, even when at the school gate waiting for their kids.
This isn’t our experience.
Ever since we started our vege patch in the front garden, we’ve met and chatted with folks from the surrounding area.
When we’re working in the garden, five minutes doesn’t go by without someone saying ‘hi’ when walking past, or mentioning ‘I love your garden’. We’ve had many conversations over the front fence, about gardening, the local area and local gossip.
One morning when opening the front door I found several rolls of insect netting, and the letter shown above.
How nice is this! These are locals that we chat with, but they aren’t our close friends. So it’s lovely that they thought of us, and went out of their way to be of help.
So: want to feel better connected to your local neighbourhood? Start growing veges in your front garden 🙂
Local recognition for our garden
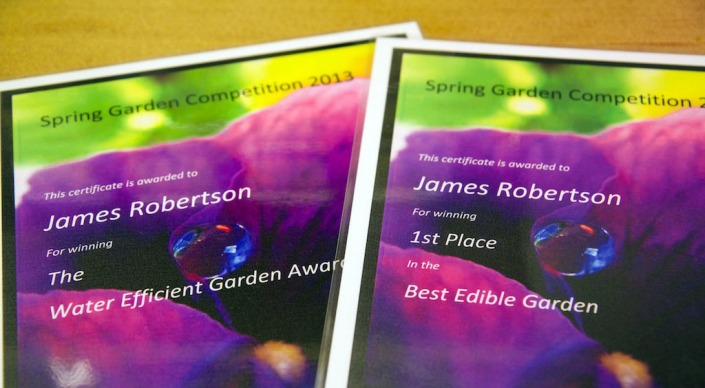
It’s always nice to have a bit of recognition for your efforts, so we were pleased to receive two 1st place certificates in Marrickville Council’s yearly garden competition. The first was for the “best edible garden”, while the second was for the overall “water efficient garden award”.
It’s a small thing, but it’s made us very happy. 🙂
Urban greenery in Vancouver

Last week I was in Vancouver (Canada) for work, and in amongst the conference and meetings I had a chance to walk through most areas of the city.
It’s a lovely city. It’s also interesting to see little patches of greenery popping up in unlikely spots.
This includes a green roof on top of a skyscraper (above), and community gardens squeezed into unused spaces (below). There were also a few rain gardens, which looked to have been installed as part of the preparation for the Winter Olympics, which were held here a few years back.
Say what you like about top-down policies and strategies for addressing climate change. Even in the absence of these, cities around the world are undergoing a quiet revolution that is connecting people to communities, food and the environment.


This is what 3 cubic metres of compost looks like

I recently ordered a large delivery of compost, to be mainly used in the guerrilla gardened space behind our house. Much of that soil is heavily depleted, and I wanted to give our fruit trees the fastest rate of growth this year.
Why order such a big pile? For the simple reason that it cost $51/m3 to buy in bulk (plus a delivery charge), compared to $9 (or more) per 40L bag if purchased at a garden centre (or Bunnings for that matter). And a it takes a lot of 40L bags to make up a cubic metre of compost. That’s a big saving!
This time around, I purchased the compost from Australian Native Landscapes, who have a nice range of recycled products.
We ordered “RE-CARB® ESSENSE”, which is described as:
Humus rich, 100% organic compost is specifically designed to build soild carbon levels and soil microbial activity. Apply 75mm and dig into tired, nutrient poor soils. Suitable for all plants, this compost is particulary beneficial for phosphorous sensitive Australian natives.
That matched exactly what we needed! In general, I really like the idea of using recycled coffee grounds, Sydney sewage, wood chips, etc to make compost. Much better than going into a tip…
Is this Sydney’s smallest green roof?

A green roof is where a garden is installed to cover a roof, typically to a depth of 150mm on top of a strong waterproofing layer. It’s a great way of getting extra greenery into a property, and the roof also asborbs water run-off.
About a month ago I stumbled across the book Small Green Roofs, on Amazon. It’s a wonderful book that has 40 different inspiring case studies, all covering small, non-commercial green roofs (full book review to come).
Feeling inspired (and running short of projects around the house), I decided to construct a green roof at the end of the chicken run.
At 1.2m x 1.6m (1.9m2), this may be Sydney’s smallest green roof.

When we created the chicken run, I installed several left-over sheets of Colorbond at the end of the chicken run, to give cover for the chicken feeder (and the chickens!). This is now replaced by the green roof.

The starting point was to install a sheet of 25mm exterior-grade structural ply. This is very strong (and heavy), and it provides the base for the green roof.
The next challenge is to deal with the extra weight of the green roof. For a soil depth of 150mm, a green roof weighs 250kg per sq. m. That’s a lot!
Thankfully the chicken run was constructed strongly in the first place. To provide extra support, I installed a new vertical post (front left corner of the new green roof in the picture above). This was concreted into the ground. Extra rafters were installed, along with bracing back to existing posts.
Other than the structural ply, everything else used wood and materials salvaged locally, or left over from the house renovation.

The sides of the green roof were constructed out of left-over roof beams, 200mm high. Because the sides of the wood were very uneven (from sitting in the weather for 10+ years), I put in an extra layer of ply to assist with waterproofing.
There’s a 20mm gap along the bottom edge of the green roof, to allow water to drain away.

I had some left-over “pond liner” paint, so I used three coats of that to seal the base and sides of the green roof. On top of that I installed a layer of 20mm Atlantis flo-cell (left over from the reworked raised garden beds). A layer of geotextile then keeps the soil out of the drainage system.

As a stroke of luck, just as I was ready to fill the garden bed, a friend rang to ask whether I needed any soil, as he was clearing out his back garden. A ute load’s worth of soil later (courtesy of GoGet), this is the final green roof.
Green roofs would typically be planted with sedum (a low growing succulent), to cope with the extreme conditions and low water levels. In this shaded position, however, that isn’t an option.
Instead, I’ve put in some water crystals, and have planted out the garden with a mix of:
- lomandra
- dianella
- ferns
- native ground covers (native violet, white root and northern cranesbill)
Already it looks great from the back verandah, and I’ll blog new pictures in six months after (hopefully) the plants have all grown up.
Organic gardening has changed since 1972

We were recently given a pile of 2nd hand books, about organic gardening and healthy eating. They mostly date to the 1970’s, published in the UK or the USA.
One of the books was “How to grow food organically”, shown above. There’s a bunch of good stuff in it, although not presented in an easily digestible way.
But this was the real surprise lurking within:


Yes, that’s an advert for cigarettes, within an organic gardening book. “Stop poisoning yourself and your environment!” says the cover of the book. Except for the cigarettes, of course. Times have changed since 1972.
(I’m giving the Gary Null, the author, the benefit of the doubt here. I’m sure it was mindless publishers at the time, but it’s still pretty damn weird.)
Built (not) to last

As a novice gardener, it’s hard to think and design for the long term. Things going into the garden need to last not just for months, or even years, but perhaps decades. Our consumer society also tends towards fancy solutions that aren’t robust.
Our worm farm is a perfect example. I’ve had it for years, and it was a lovely solution. It sat on my balcony, resting on four legs. Sliding doors gave access to the vermicast, and there was a tap to draw off the worm juice.
It wasn’t to last.
- The tap was the first thing to go, when it clogged up and stopped working.
- When shifting the worm farm on the balcony, one of the plastic legs broke off.
- Then when moving it to our new house, I discovered that the bolts holding the sides together had rusted into a mass of iron.
When we got it to the house, I abandoned the three remaining legs, and sat it on a row of bricks. But over time, the whole thing sank into the ground, at an angle, so the lid didn’t go on properly.
So with my new-found renovation skills, I made a small concrete pad for it, as shown above. The base, with its broken tap, was finally discarded.
The result: four sides and a lid, sitting on concrete. This will last!
It’s a lesson that’s hard to learn, and it highlights why we should always listen to our grandparents when it comes to gardening. They’ve seen and done it all, and have long since settled on solutions that work for decades…
Lots of limes

We’ve been pretty quiet about our citrus growing on this blog so far, despite having a lemon, lime, two oranges and a grapefruit in the ground. Why? Let’s just say, they didn’t prosper in their first 18 months.
What turned things around was some reading about their hungry nature. We’d been giving them regular handfuls of citrus fertiliser, but they were still struggling, barely growing, and not fruiting.
Then I read the following from two different sources:
Citrus trees need 0.5kg of fertiliser for each year of age … per year.
Eeek! That’s a lot of fertiliser, certainly a lot more than the handfuls I was applying.
Ramping up the feeding quickly showed the value of this advice, however. All the trees starting growing strongly, with the yellow vanishing from the leaves, and flowers sprouting. They’re now well on their way, and I’m expecting good things from them over the next few years.
The photo above shows our first real harvest of citrus. Noting that the lime tree was weighed down by fruit, I harvested a bucket’s worth. This turned out to be 45 limes, from a tree not as high as my shoulder. That’s more like it 🙂
City of Sydney’s Footpath Gardening Policy
In urban environments, the strip of grass alongside the road is the only green space available for residents. While verge plantings are often wonderfully vibrant (including our own), they can be held back by a lack of clear support (and guidelines) from Council.
It’s therefore great to see City of Sydney get out in front on this issue:
The [City of Sydney’s] Footpath Gardening Policy has been developed in order to allow the public to establish a garden or nature strip without a development application. Council adopted the recommendation to allocate an impressive $50,000 for seeds and plant boxes to help kickstart this important process for the first six months.
via Concrete Playground.
We’re aware that there’s a draft policy in progress at Marrickville Council, although it’s been a long time coming, and still hasn’t seen the light of day. Hopefully soon!
Wealthy communities & the Permaculture Biz

Robin will give a brief PowerPoint slide show titled ‘Wealthy Communities’ which showcases co-operative and community strategies that support the creation of real wealth. Robin’s primary passion is interactive group work and creative learning so, to complete the evening, you’ll get to experience an activity that will support teamwork and the deepening of connections and networking within your community.
This event is open to the public and all are invited. Attendance is free to members of Permaculture Sydney South and North and $10 for non-members.
Bookings can be made at events [at] permaculturesydneysouth.org.au or by calling 0412 679 215.
