Making fire starters
I recently stumbled on a recipe to make fire starters using dryer lint and wax. We have plenty of both, plus a fireplace at the farm, so I thought I’d give this a go. It’s so easy!

First I put the dryer lint into the seperate portions of an egg carton. Meanwhile I melted beeswax. Then I poured the hot beeswax over the lint. Once the wax had soaked into the egg carton and hardened, I cut around each fire starter with scissors to make 12 fire starters.

Given that all the ‘ingredients’ are extremely flammable, the fire starters work perfectly, as good as the (toxic-smelling) fire starters you can buy in any hardware or camping store.
Acacias as pioneer species in an edible forest garden
One of the defining features of an edible forest garden is the process of instant succession.
As the planner of an edible forest garden, I have a (reasonably) clear idea of the end state that I’m looking for. This includes having all the ecosystem niches filled, so the garden is as stable as possible, requiring the minimum of maintenance effort.
Instead of just hoping for the best, instant succession involves planting a whole set of plants at the outset to shape what direction the garden takes. So in the one hit, you plant the edible trees, mid-storey bushes, herbaceous plants and groundcovers.
One of the key players in an early edible forest garden are pioneer species. These grow very rapidly, even in low fertility soil, to provide protection for everything that follows.
In an Australian context, acacias (wattles) provide an ideal pioneer species. There are hundreds of varieties, that grow from prostrate bushes to large trees, so there’s an acacia for every situation.
Best yet, acacias are nitrogen-fixing. They can also be pruned heavily, which adds this nitrogen into the soil, from the roots and fallen branches.
But that’s all in theory. In practice, the wallabies (or wombats?) ate all the acacia seedlings we planted, and the drought conditions probably didn’t help either.
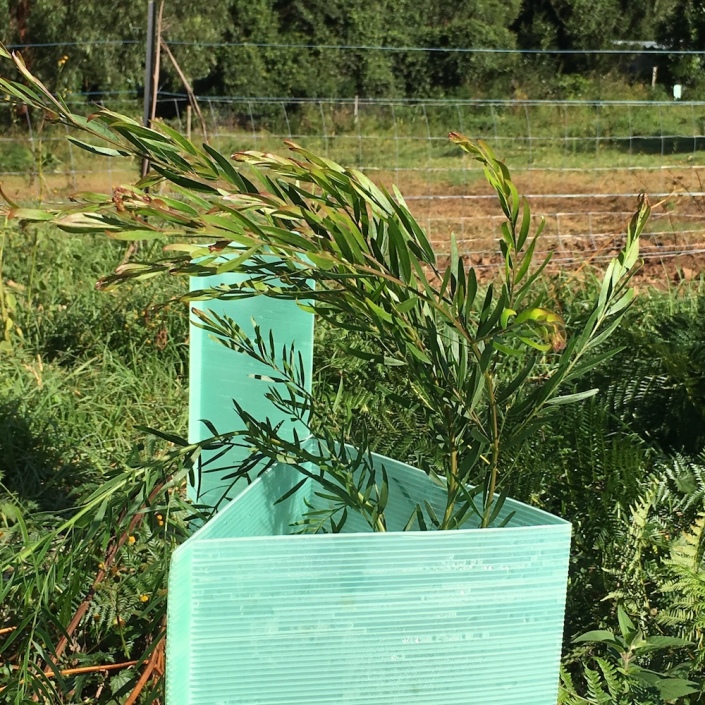
Thankfully things are now going better to plan. As you can see from the photo above, the more recent acacia fimbriata seedlings have burst out of their tree guards and are heading for the sky. These will be allowed to grow into small trees, providing a temporary canopy for the fruit trees below.
In due course, they can be heavily pruned or coppiced, or potentially removed entirely, as the fruit trees reach full size.
Our first citrus patch: going to plan, or to ruin?
I could hear my neighbours thinking, when I proudly showed off our first citrus patch:
“This is what he’s been blogging about?!? What a mess! He must be mad!”
I can understand why they think that. The mainstream advice for an orchard, described in the most recent Gardening Australia magazine, is: “space the trees widely enough apart that you can easily mow between them”.
This isn’t what we’ve done. Instead, we’ve been creating a citrus guild.
To recap: the goal is to plant around the citrus tree with a variety of beneficial plants, bringing nutrient up from the soil, attracting beneficial bugs, and controlling grass (the enemy of all fruiting trees).
This is was my sketch of what it would look like:

But seeing the reality, you can understand why our neighbours are having second thoughts:

The growth has been extraordinary, a testament to the quality of our soil, and the benefits of breaking up compaction from years of horses grazing. Still, it’s hard to even spot the dwarf citruses amongst everything else.
The rapid growth of the bracken ferns has been a surprise, but I think in a good way. Since these ferns are known to act as ‘dynamic accumulators’, bringing up nutrients from the soil, they seem like an ideal groundcover. The grass certainly doesn’t stand a chance against it.
The salvias have pushed through and are flowering profusely. The rue, yarrow and fennel are all flowering to the benefit of beneficial bugs. The comfrey is growing, but is struggling against the bracken ferns, so we’ll see how that goes.

The citrus trees all suffered heavy transplant shock, but I’m hopeful they’ll start to take off in earnest next season, pushing above the ferns. The pomegranate at the centre of the patch also hasn’t thrived, but we have just had the driest summer in 20 years, so I’m hopeful for next year.
Watch this space, and I’ll continue to report on the journey of our edible forest garden patches … to success, or ruin.
(I’ll also post some aerial photos and videos shortly, which will give another perspective on how it’s progressing.)
We have plenty of beeswax!

This is what 2.5kg of pure beeswax looks like.
One of the many advantages of Warré hives is that the bees draw new comb each season, meaning the wax is harvested as well as the honey. This produces a lot of lovey chemical-free wax!
(If you’re wondering about the strange patterns, this is the byproduct of pouring the filtered wax into containers that have water at the bottom, to stop the wax sticking.)

We do a variety of things with the wax, including hand lotion, home-made fire lighters and candles (of course!).
We still have plenty of wax left over, so knock on our door if you’d like to buy some for your own projects 🙂
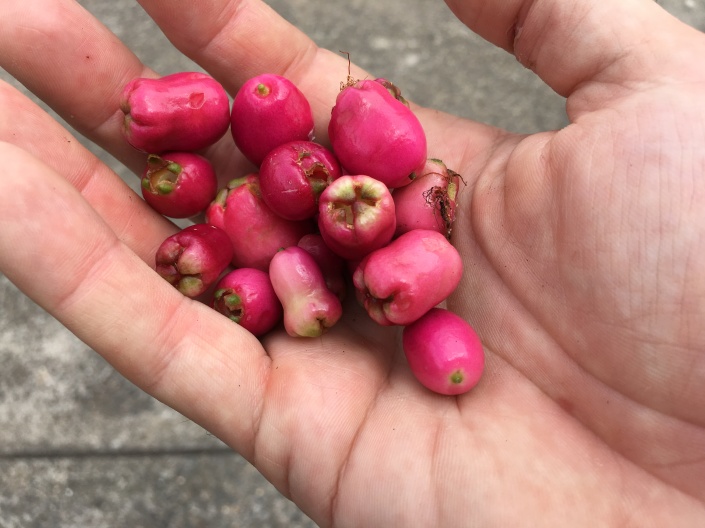
Growing your own lilly pilly from foraged seeds
This is the season for lilly pillies (syzygium and acmena) to flower and fruit. And if you want a lilly pilly in your own garden, it’s easy: just find a local bush that has fruit you like the taste of.
The outer flesh of the fruit prevents germination, so eat that off. Then plant the seeds in some seed-raising mix. Wait and watch them grow!
We’ve found them to strike very easily and to grow vigorously. Once they get bigger, divide them into individual pots. Then transplant them into the garden when they’re ready.

These particular plants are Syzygium Leuhmanii, which have a crisp cinnamon taste. We’re growing a whole hedge of them down at the farm, from Lewisham-collected seeds 🙂

Rescuing bees from a compost bin
A week ago I received a call from someone just the other side of Lewisham, saying they had a bee problem. What I found was pretty funny!
Apparently a swarm of bees had taken residence in the backyard compost bin. In an effort to discourage them, the property owners removed the lid. Despite the difficult circumstances, however, they bees kept soldiering on.
The process of rescuing the bees is relatively straightforward. Going in with a knife and hands, the pieces of comb are carefully removed from the hive. They’re then rubber-banded into empty frames.
(You can see a mix of brood — baby bees — on the right, and partially filled honeycomb on the left.)
To encourage the bees to move into their new home, I placed the hive directly on top of the compost bin. Later that night, they apparently all moved into the hive without any complaints.
What’s amazing is that it’s possible to do all this without getting any stings! Despite me literally attacking their hive with a knife, they were relaxed throughout. Phew! (It doesn’t always go this smoothly.)
Last night, the bees were sealed into the hive, ready for their move down to the farm, joining the three hives already in place.
Once they were unsealed, the bees rapidly spread out to ‘re-map’ their new location. Within a few hours, they’d settled down, and this afternoon I did the final clean-ups of the hive, again without any angry bees.
Beekeeping always throws up interesting surprises!
Planting as we go
Too many properties are landscaped as an afterthought, with plants going in long after all the other work is done (or not at all). This is not how we’re tackling Lewisham Farm.

We’re intentionally planting as we go, entirely with Australian natives. This includes a wide mix of callistemons (‘bottle brushes’), grevillias, banksias and leptospermums (‘tea trees’).
There are good reasons for these plantings:
- Most flower heavily, attracting native birds and feeding the bees.
- They will flower throughout the year, providing Priscilla with cut flowers.
- They will screen things like the shed and water tanks, blending them into the landscape when viewed from the house or road.
- They help to define ‘garden rooms’, breaking up the acres into smaller spaces with their own character.
- When planted densely, they will keep down the weeds, at least to some degree.
- They will be beautiful, making the farm a lovely place to spend time.
By planting them early, they get a head start in the disturbed soil, before the grass and weeds have had a chance to reestablish themselves. It also means that we’ll get the benefits sooner!

By largely using tube stock plants, the cost of plants for a given area is only $50-100, which is nothing in the scheme of things.
And there’s much more planting to come…
Putting in place the basics of farm infrastructure
As you can see from the “before” fly-over, our farm came with a lovely farmhouse, but not much else! Certainly not enough considering we’re totally off-grid in terms of power, water and sewage.
So while we’ve started planting out the first few patches of the edible forest garden, the focus has been on getting the basics of farm infrastructure in place.

The centrepiece of these efforts has been the new farm shed (aka “the barn”). The local council required us to position it away from the road, so it ended up half-way down a slope.
Echoing the design of an American barn, the shed is 10.5m wide and 7m deep, with a big 3m x 3m central door for the tractor.

Since the barn is now in the middle of a field, a new internal driveway was required. Befitting the location of the house, we decided to go all-out to create a pretty road.
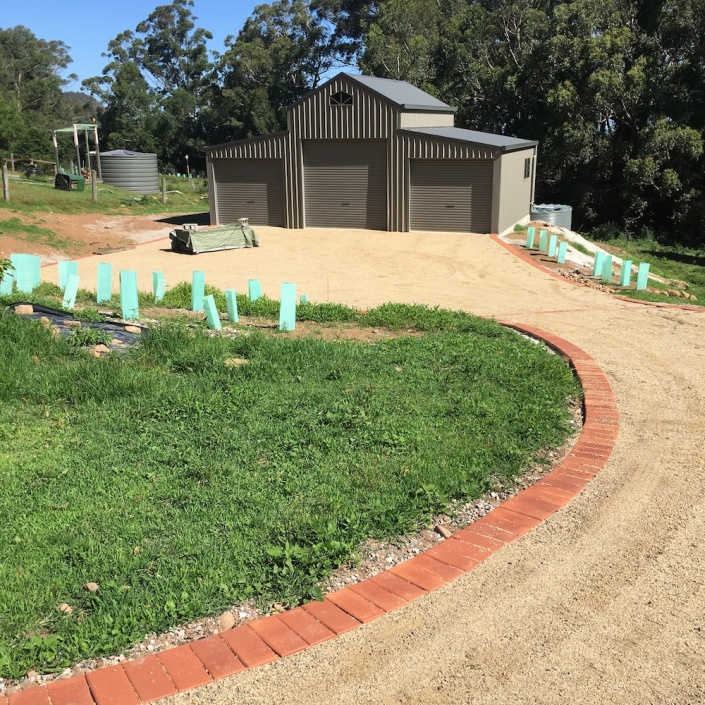
This meant a road surface of crushed granite (on a solid road base), with brick edging (on a concrete edge laid alongside the full length of the road). With Priscilla’s keen eye for aesthetics, we laid the road out with elegant “swooping” curves. We put a single car-parking spot in front of the house, plus a large parking area in front of the barn.

The final phase was the addition of two 22,000L plastic water tanks below the barn, to catch the run-off from the roof. This triples our overall water storage.

Oh, and with the barn in place, I was able to purchase a brand-new 46hp Kubota tractor, which will be vital in reshaping the property 🙂
This is, however, still just the start of more work needed on the basic infrastructure. Activities yet to be done:
- One final water tank on high ground, which we’ll switch to using for the house, plus the garden. That will get us up to about 100,000L in total.
- A water pipe laid from the barn tanks (at the bottom of the property) to the new water tank (at the top), with a solar pump used to get the water up the slope.
- A power line run to the final tank, for a good-sized pump.
- A vegetable patch and greenhouse, with a water line run from the tank.
Phew! Still, a lot of this can be done with the new tractor, and everything is more fun with a tractor 🙂
The “before video” of Lewisham Farm
This video was taken a few months after we acquired Lewisham Farm, 22 hectares of paradise overlooking Nowra. The property is completely off grid (water, power & sewage), and the land is 2/3 rainforest.
In this aerial view, you can see:
- The farmhouse, which is lovely, but requires a lot of little fixes
- The new solar PV, which we had to put in quickly when the old system died in week one
- One small water tank containing 15,000L, which ran dry at the beginning of Summer
- The concrete pad for the farm shed (now constructed, photos to come!)
- A single beehive, now kept company by two others
- The first two citrus patches, starting our journey towards an edible forest garden
- Plenty of open fields, some of which have been heavily eroded by horses
- The beautiful Australian bush that surrounds our farm
A heap has happened since this has been taken, follow us on instagram for more photos and videos to come!
Discovering a hidden source of watercress
One of the great things about acquiring a 22 hectare (56 acre) farm is that there are still many hidden corners and surprises yet to discover.

One was the discovery of a small spring that feeds into the gully that runs beside the farmhouse. This has been running (slowly) even at the end of the recent very dry winter and spring, so that’s a good sign.
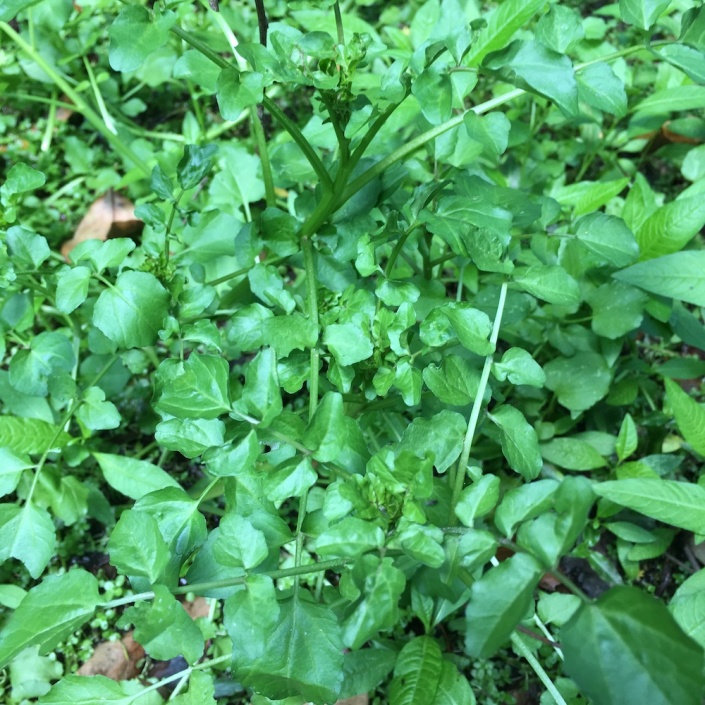
What we also stumbled across was a patch of watercress growing in the mini wetland at the top of the valley. The steady flow of water is exactly what it likes, and I can only guess that the previous owner must’ve planted some (?).

Anyway, it tastes delicious on a sandwich, and we have every reason to expect that it will keep happily growing indefinitely…
